

Active Fine Art Posts


How To: Draw the face of an anime style girl in three quarter view
This is a very basic tutorial for those interested in learning how to draw anime girls, focusing on how to draw their face in a 3/4 profile. Follow along with this easy tutorial, using a pencil and paper to show you this simple anime technique.
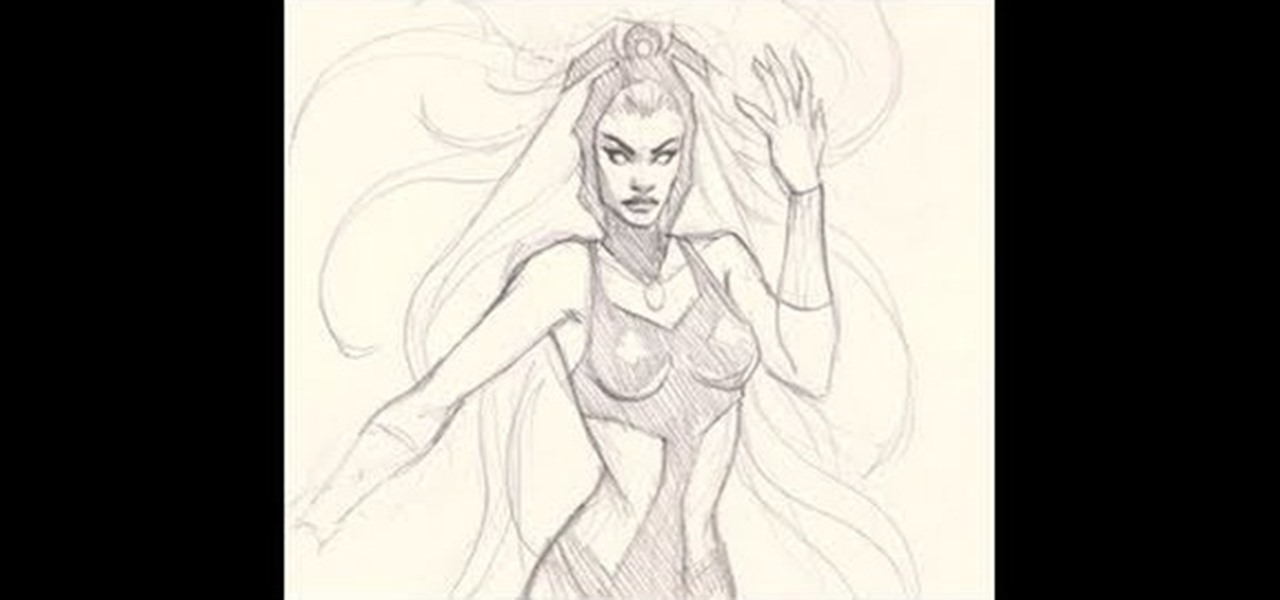
How To: Draw a pencil sketch of Storm from the X-Men comic books
Storm is a popular superhero in the X-men comic books who has control over the wind and weather, and this tutorial shows you how to draw a pencil sketch of her. You'll become an artist like Stan Lee in no time!
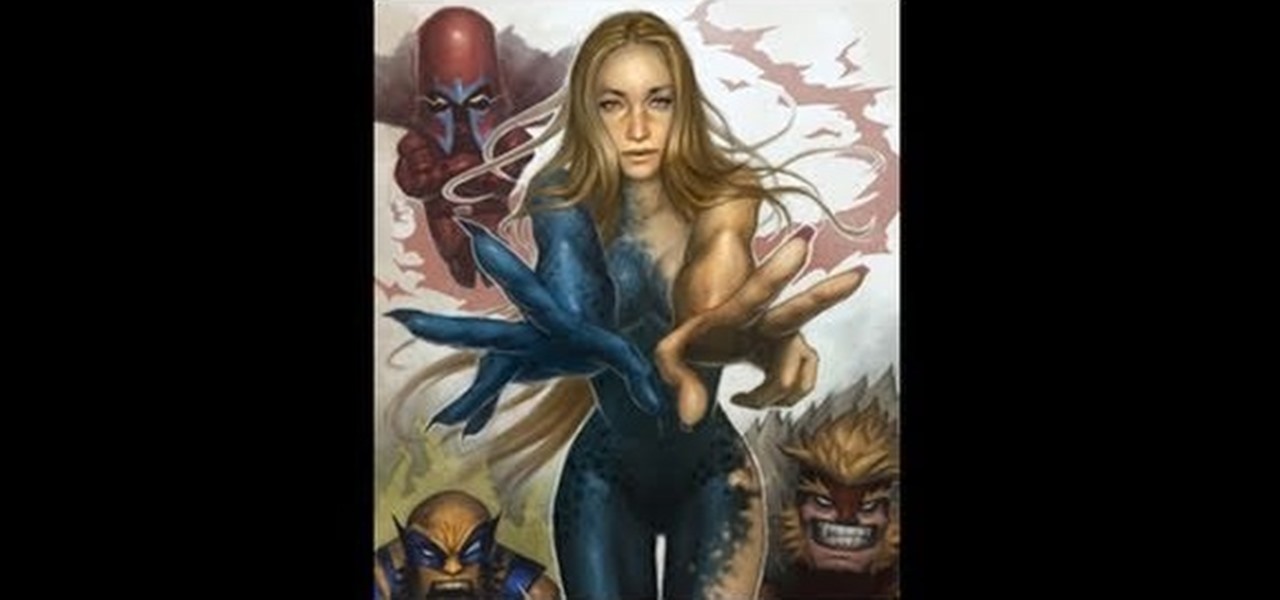
How To: Create a digital painting of the X-Men superhero Mystique
This step by step tutorial shows you how to start with a blank file and then go step by step to create a digital painting of the X-Men superhero Mystique. It pays special attention to details like her hair and her unique skin texture.
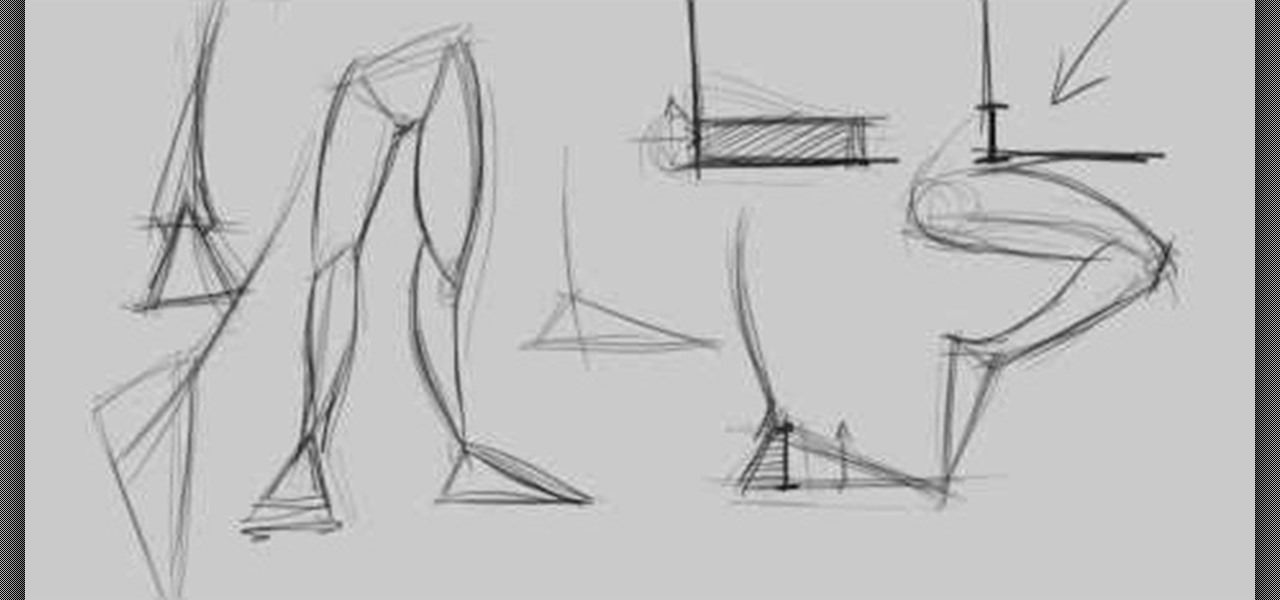
How To: Draw feet using digital drawing software like Photoshop
This two part tutorial is all feet, all the time. Done in the comic book style, this tutorial shows you how to expand on the basic triangle to draw realistic and proportionate feet, as well as avoid some of the pitfalls new artists encounter when trying to master feet for themselves.
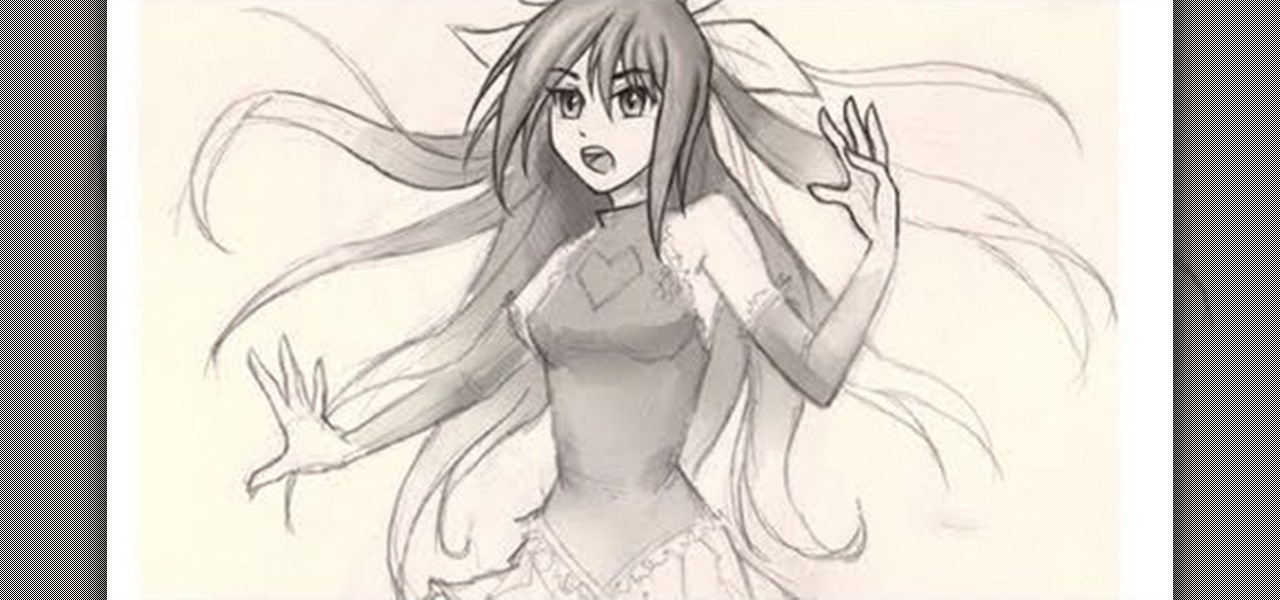
How To: Draw the main body of an anime or manga style girl
This is a quick tutorial which nevertheless will teach you how how to properly draw the body of an anime or manga style girl. Break everything down into geometric shapes and then make small alterations to your shapes for your figures and drawings.

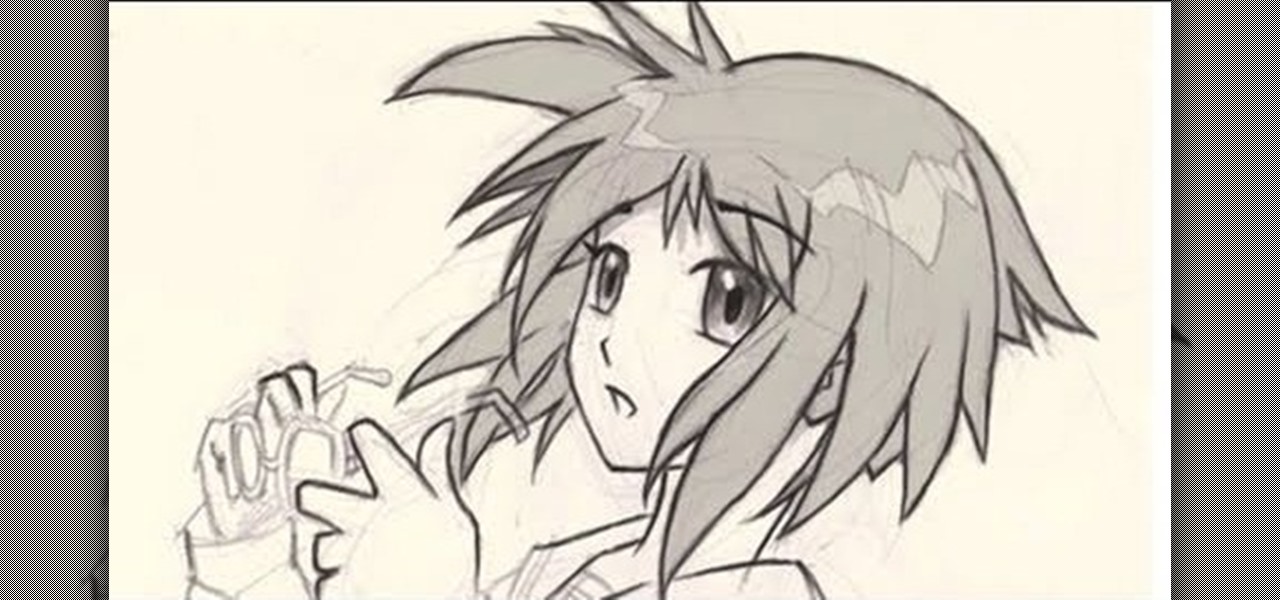
How To: Draw the hands of anime or manga style girls
This video focuses on drawing the hands of anime girls. It also covers foreshortening, and how to accurately depict hands when using this technique. Use this technique when you want to emphasize your character's hands, such as when she gets into a fight.
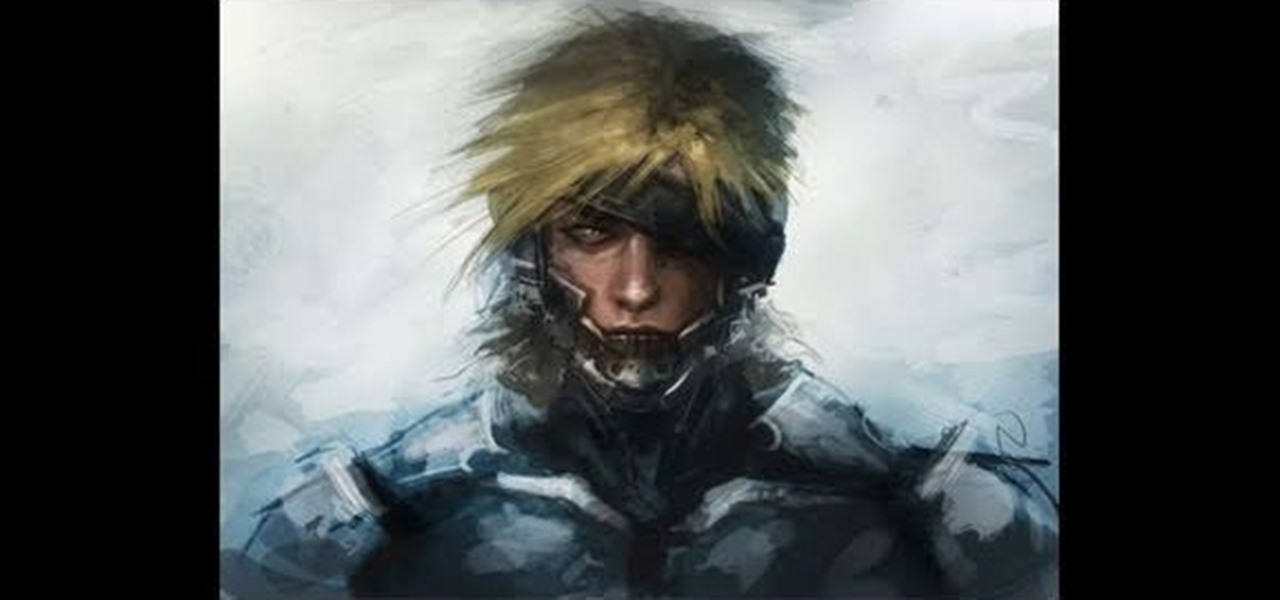
How To: Create a digital painting of the Metal Gear Solid character Raiden
This tutorial shows you how to use your favorite drawing or art program (like Photoshop or GIMP) to create your own digital painting of Raiden, a character from the popular video game Metal Gear Solid. After creating the basic sketch, this video shows you how to create your own painting.
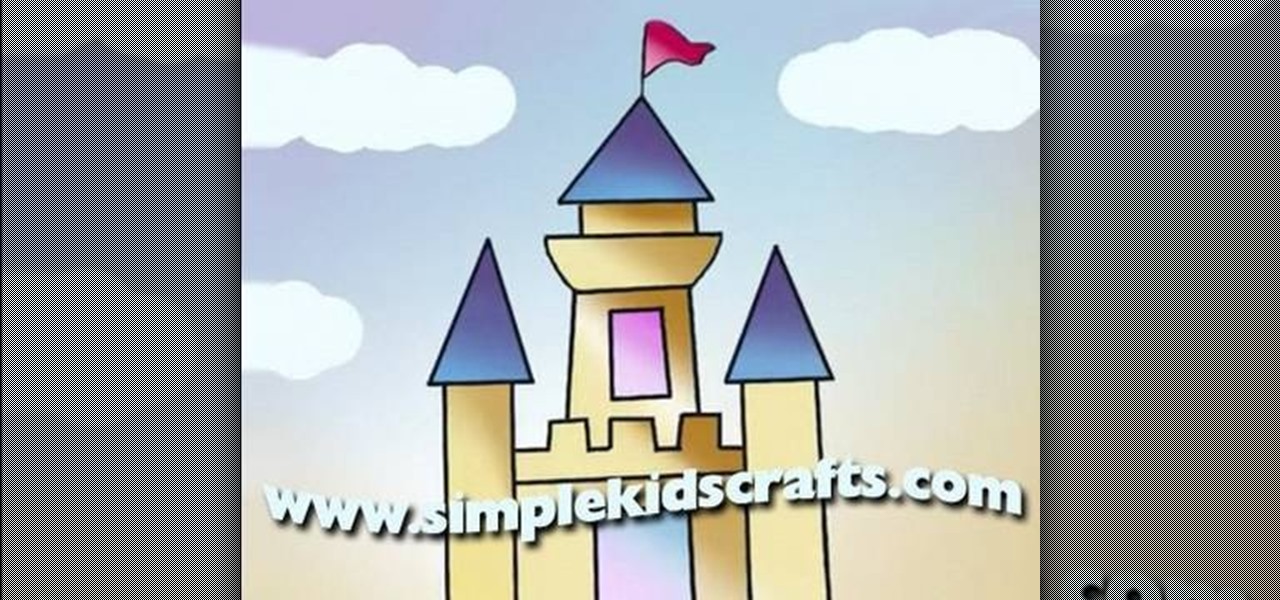
How To: Draw and color in a simple castle for kids
This basic drawing tutorial is aimed at young children who want to learn how to draw a very basic castle, with one middle tower and two smaller turrets off to the side. Follow along with your child - all you'll need is some paper, a pencil with an eraser and a few markers!
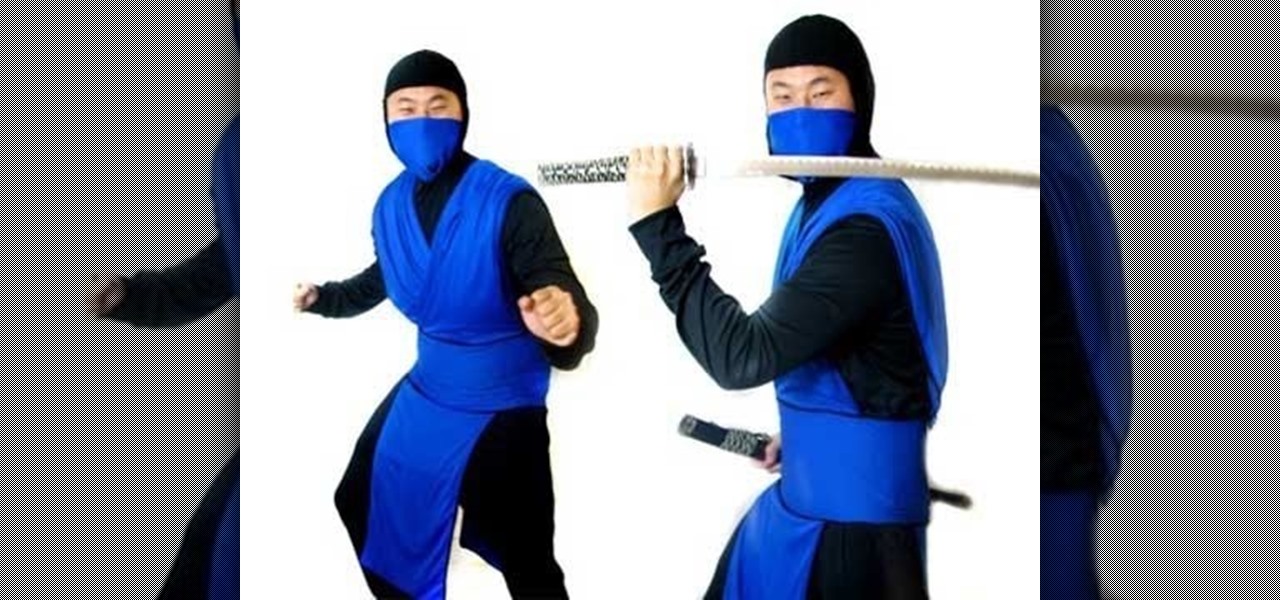
How To: Make your own costume based on Sub Zero from Mortal Kombat
This tutorial comes just in time for Halloween, but you can use it for cosplay as well. This is a very easy costume to make - all you need is a basic black outfit, and then assemble the blue rectangles to make the mask, obi and tunic.
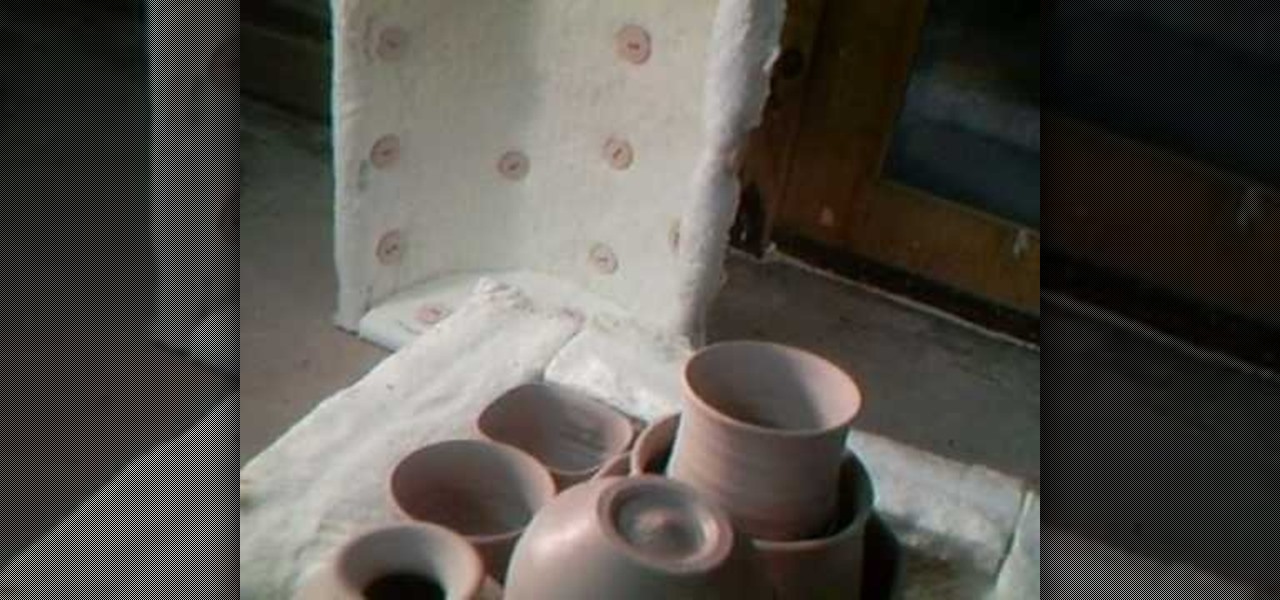
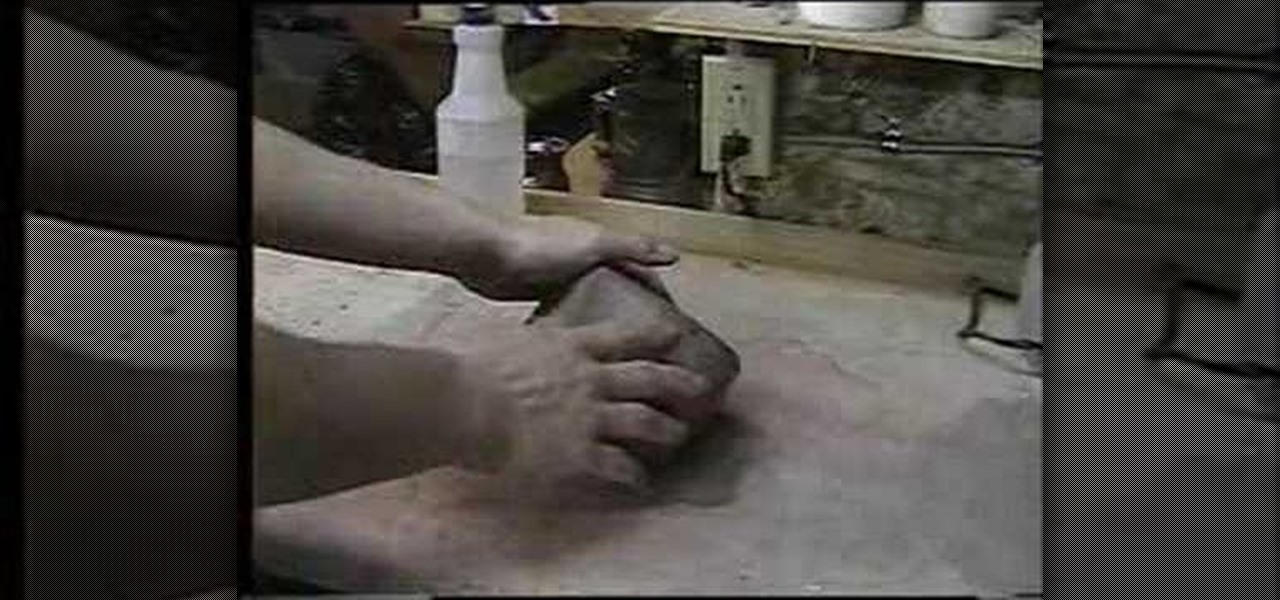
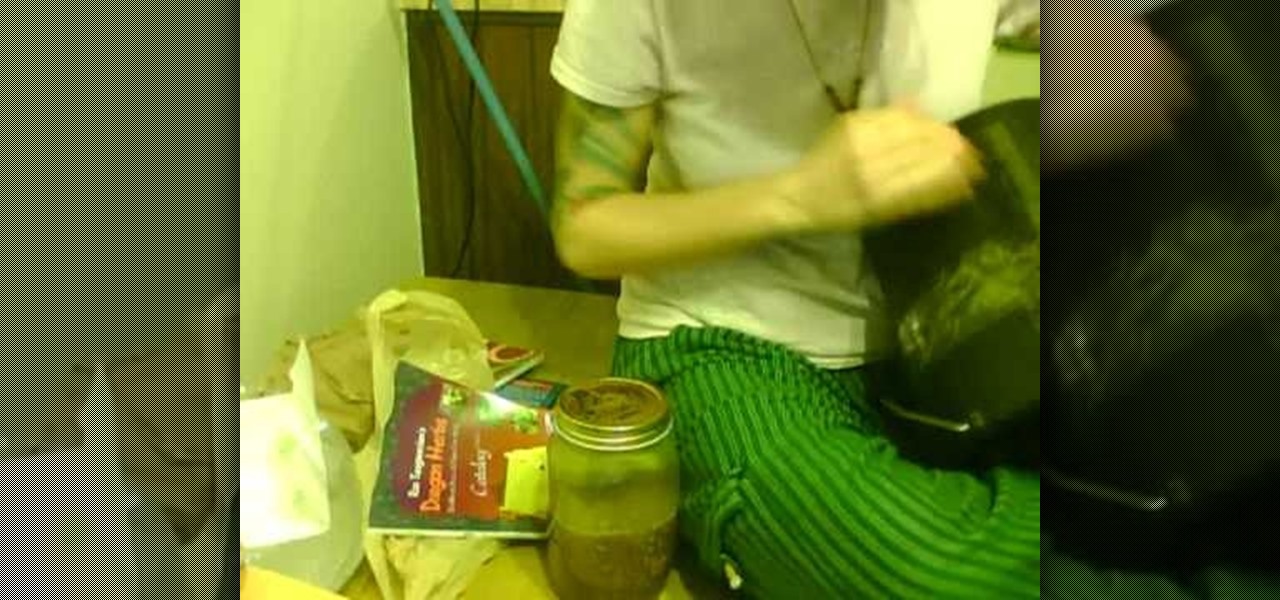
How To: Unload and repack bisque pottery from a kiln
In this video, we learn how to unload and repack bisque pottery from a kiln. First, take the top off and then take out the smaller pots from the larger ones and set aside. Then, remove the large ones and set aside as well. When you are re-loading this, you will place in the large ones first. Then, place the smaller pots in the large ones if they fit. Squeeze the small ones around where you can. Stacking some into each other is fine. Turn this on for around 30 minutes on low heat, then you can...
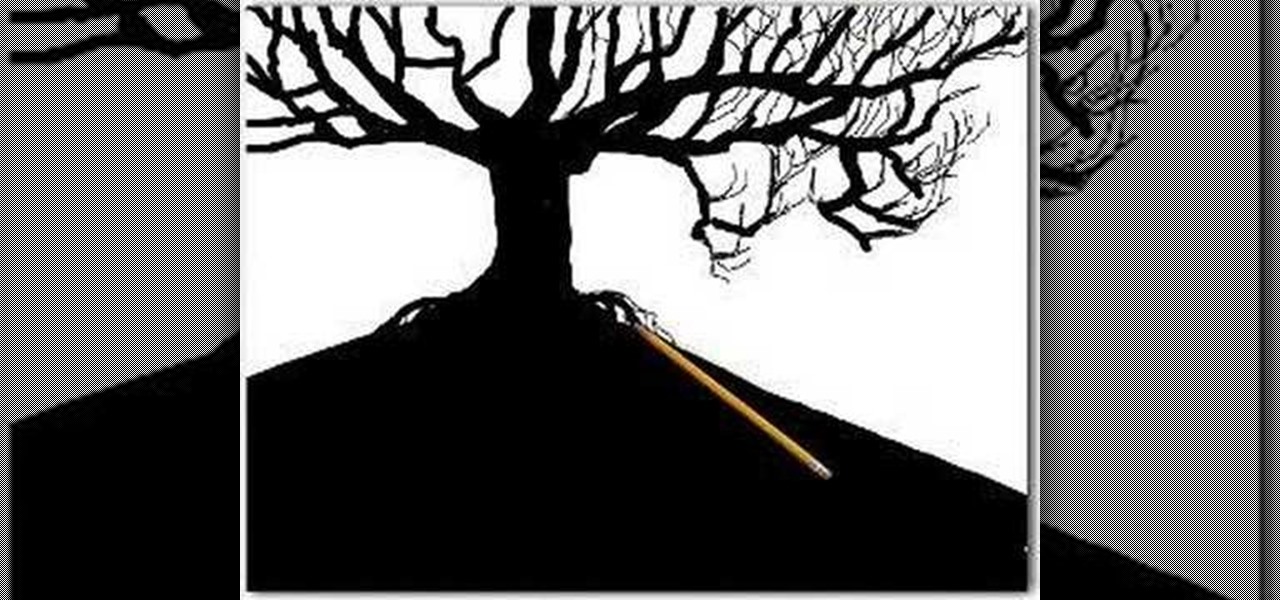
How To: Draw a tree using an additive method
Whether you are pursuing drawing as a professional or as a hobby or you are just a common person, we're pretty sure that you have drawn a tree somewhere in your lifetime. This video merely shows how to do the same in a better way. Though there is no narration (just background music) in this video, it is easy to understand the additive method of drawing. The artist starts off with a broad tree trunk and then starts adding thinner branches to the trunk that spread outwards. Then, even more thin...
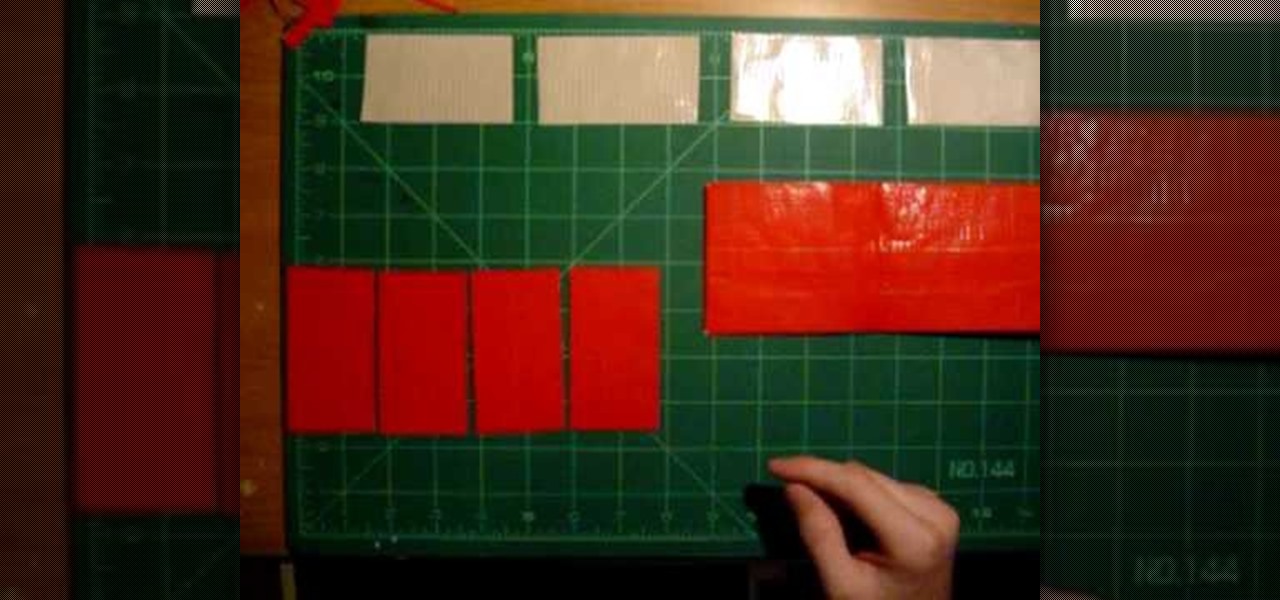
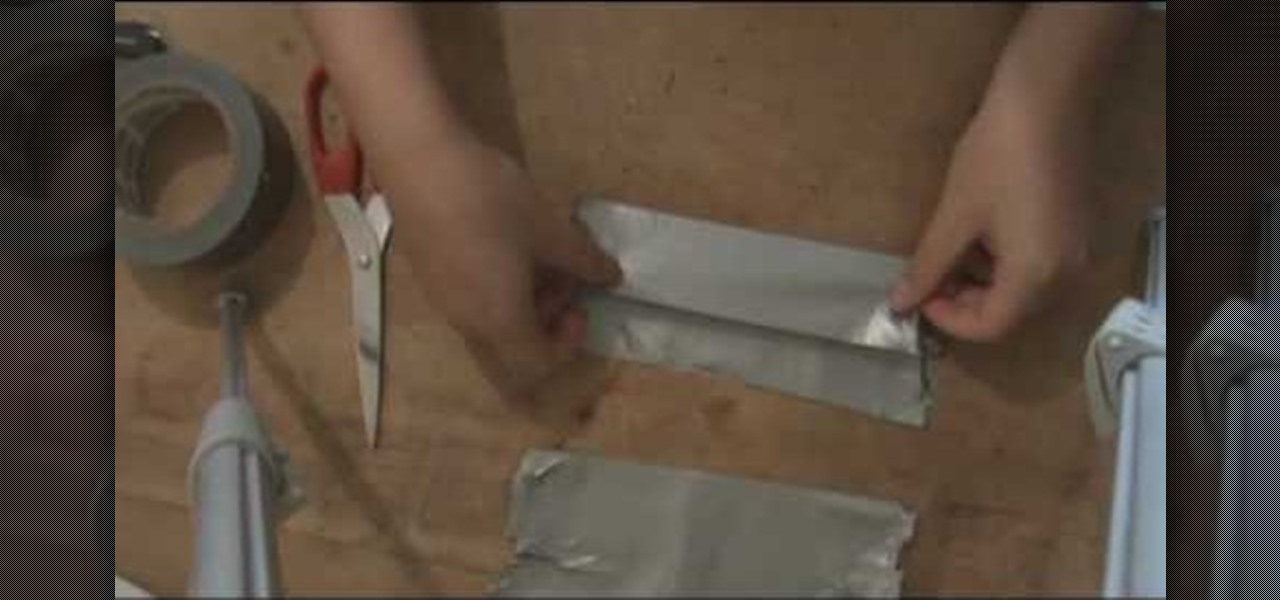
How To: Craft a bi-fold duct tape wallet
In this video we learn how to craft a bi-fold duct tape wallet. First, cut four pieces of duct tape 7.5 inches long and another slightly shorter. For the first two pieces, connect them so they are overlapping each other, then place the other two on top of them. After this, take the other piece and tape it on the top so it's a flap. Then, make one more of these the exact same way. Once you have both sides, you will place one on top of the other and line them up. After this, grab a piece of tap...

How To: Draw manga/anime clothes and folds
In this video we learn how to draw manga/anime clothes and folds. Start out by drawing the collar of the clothing up and around the neck. As you draw down, make sure you add in a bump for the elbows in a long sleeve shirt. Then, draw in the cuffs for the shirt and add in lines on them. Draw down from the elbow bump, creating two bumps near the wrist to show a baggy sweater. Make sure to add in the small details like zippers and strings on the top. Finish off the sides, leaving a gap between t...

How To: Make and arrange a painting palette
In this tutorial, we learn how to make and arrange a painting palette. First, you will need to buy a large palette that can handle a lot of different colors on it. Now, use the sides to add in the different colors that you are going to use. Use the middle of the palette to mix up colors while you are painting or doing different crafts. You can also use a large paper plate to make a paint palette if you don't have a palette nearby. Anything that is flat with a lot of room on it will work, so g...
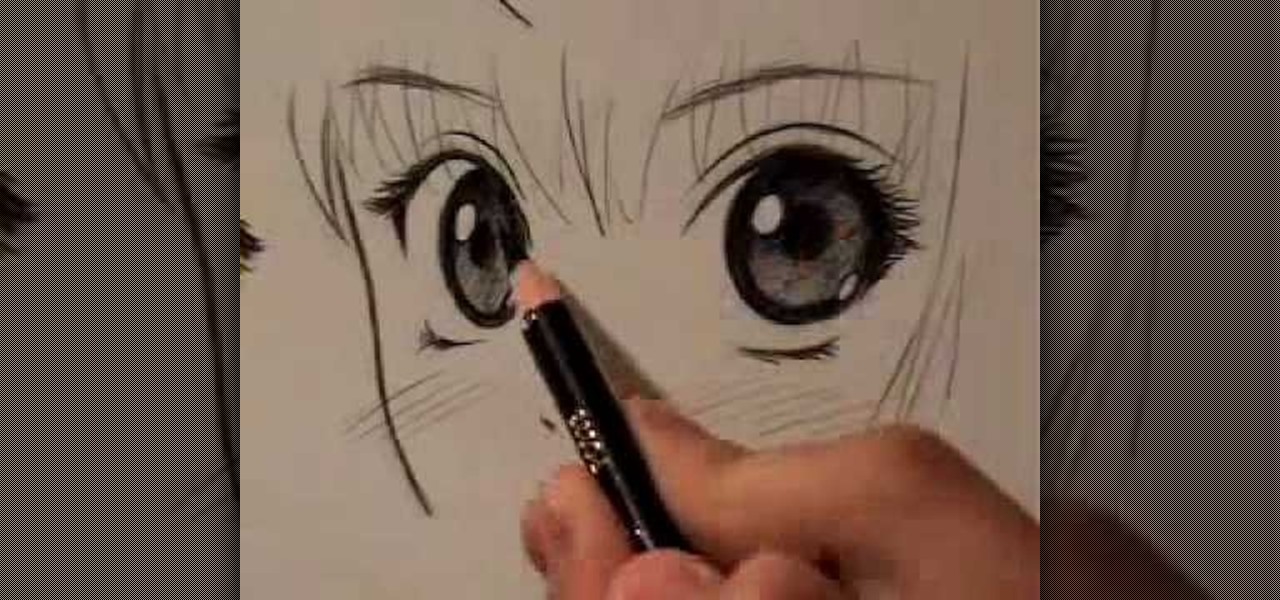
How To: Draw manga eyes in 4 different ways
In this video, we learn how to draw manga eyes in 4 different ways. The first one is a wide eyed look where you will draw large eye and then create the pupil towards the top of the eye. Draw in the lids and the top and bottom of the eye high around it. Then, for a female eye, you will need to draw in a large eye as well. But, with these you will draw in the lashes of the eyes on both the top and the bottom. For smaller eyes, you can draw them tall but make them thinner. Crosshatch the eyes to...
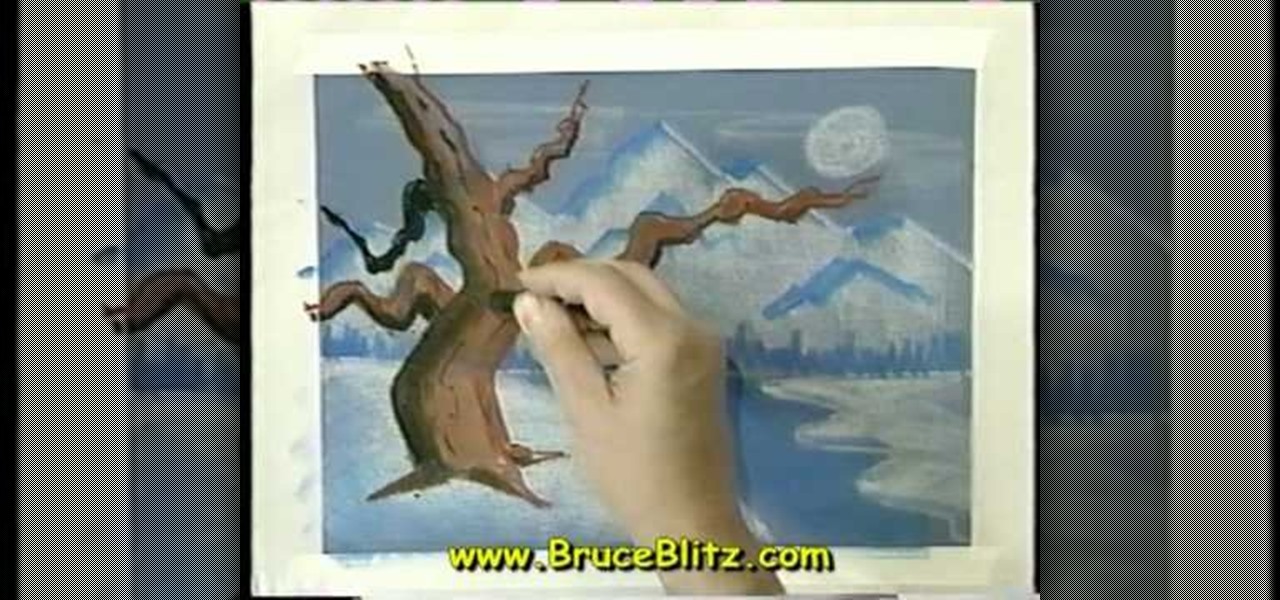
How To: Draw a tree in moonlight
In this tutorial, we learn how to draw a tree in moonlight with Bruce Blitz. Start out by using a gray piece of paper. Then, draw arrows on the page towards the top that will act as your mountain peaks. Draw in additional lines to show that the mountains are towards the top. Shade in the tops of them and then draw a river with water at the bottom of the page. After this, draw in trees at the bottom of the mountain and a moon in the upper right hand corner. Use white chalk to create the effect...
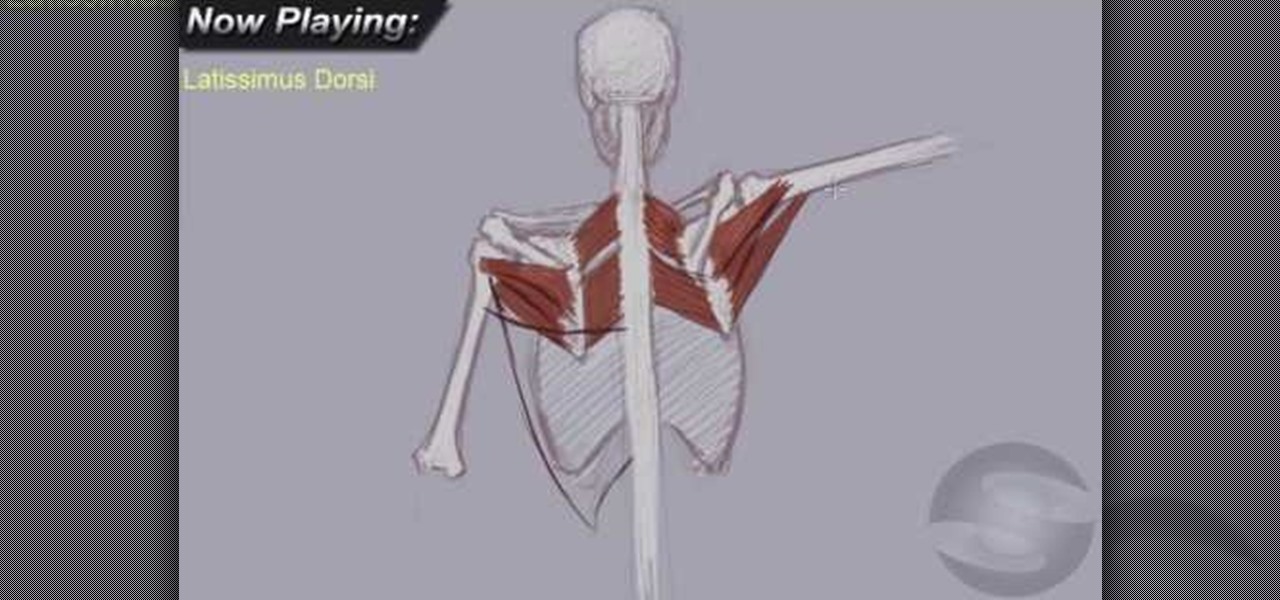
How To: Understand the anatomy of the upper back for drawing
In this video, we learn how to understand the anatomy of the upper back for drawing. First, you will need to learn how to draw the skeletal block of the body. Once you have drawn the outline for the skeleton, you can continue onto the rest. Make sure to add in the details for all the parts of the body, using thin lines at first, then thicker lines. Color these in white once you have the bone shapes made, then color in the "meat" on top of those. Draw in lines to create shading and realism on ...
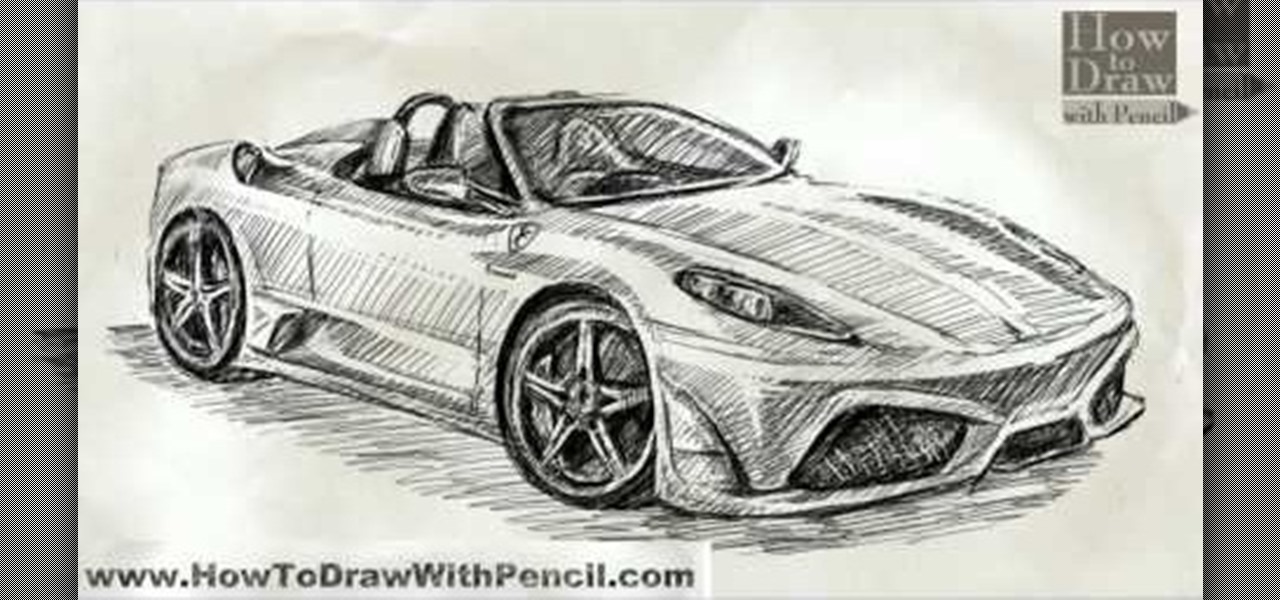
How To: Draw a Ferrari Scuderia Spider 16M
In this tutorial, we learn how to draw a Ferrari Scuderia Spider 16M. Start out by drawing the outline of the vehicle. Make sure you draw in the areas for the tires and the windshield, as well as the other areas of the car. After this, add in shading around the car on all of the sides. Next, start to draw in the details around all of the car. Add in shading and additional lines to make it look more realistic. After this, you will need to use the eraser to erase any unwanted lines that don't b...
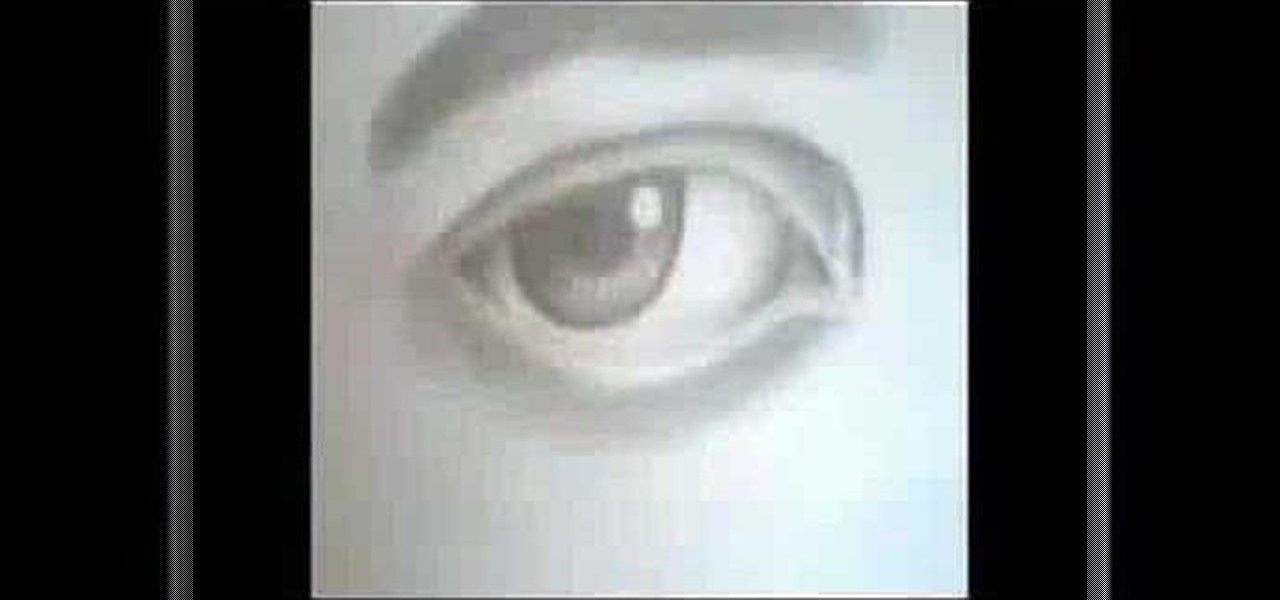
How To: Draw a perfect eye
In this video, we learn how to draw a perfect eye. Start out by drawing the outline of the eye, the create the basic shape. After this, draw the crease above the eye and then the inside details of the eye. Darken the pupil, then add in lines around the pupil to show detail. Create a circle eraser mark near the pupil to show the eye having a glare, making it look more glossy. After this, shade in the sides of the eye and underneath where the bottom lash line is. From here, create the eyebrow a...
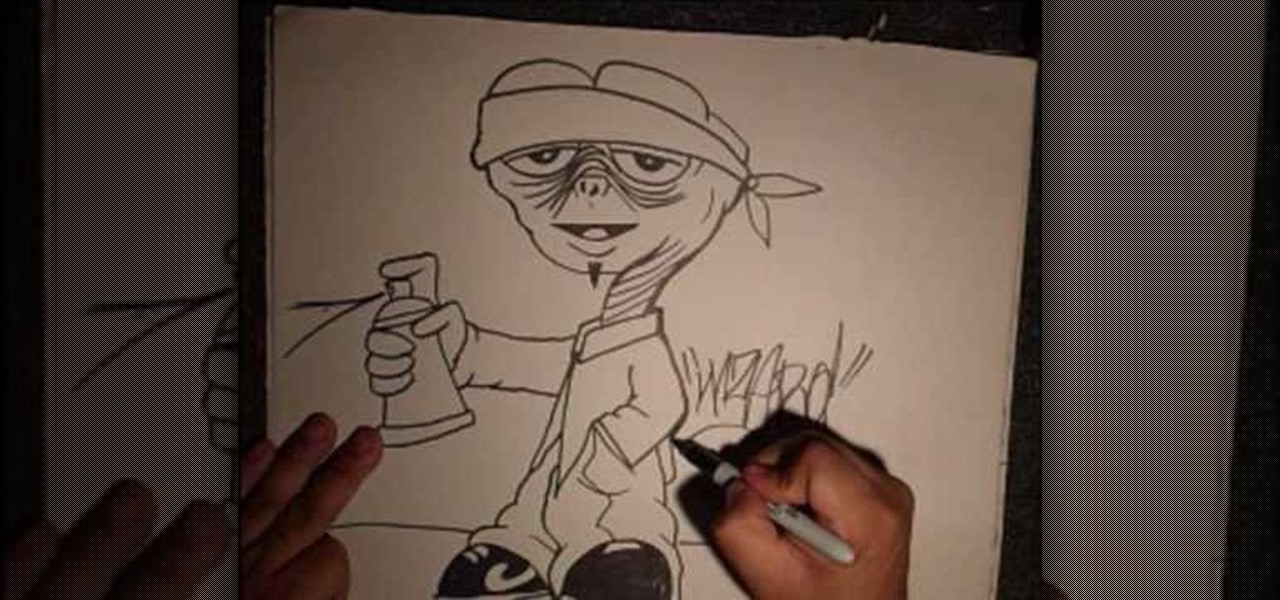
How To: Draw a gangster graffiti ET character
In this tutorial, we learn how to draw a gangster graffiti ET character. Start out by drawing the eyebrows and the hat, then draw down to make the eyes. After this, draw in the details of the eyes, then make the nose and the mouth. From here, create the head and the neck, as well as the rest of the body. Draw on large pants that look baggy on the legs and a large collared shirt. One hand should be in the pocket and the other should be facing out with a finger on a spray paint can. From here, ...
How To: Draw graffiti letters
In this tutorial, we learn how to draw graffiti letters. When you are drawing these letters, you will want to use as much imagination as you can. Make sure to add in your own personal flare to give each of the letters a special touch. Now, you will draw the letters making them into a large 3D letter. Add in swirls and lines to the edges of the letters to give them a wet look and then add in shading to the side to make it look darker. Add in more shading and darker outlines, then when you are ...
How To: Draw an eye
In this tutorial, we learn how to draw an eye. Start out by drawing the outline of the eye, which should be in a football shape. Then, draw the inside of the eye and the outside of it as well. Then, you will start to add in additional details around the eye and the eyelashes. After this, add in the crosshatch inside the eyes and shade in the pupils. Shade around the outside of the eye, then add darker lines for the eyelashes on both the top and the bottom. Add a crease in the eye to make it l...

How To: Turn an old scarf into a purse with Threadbanger
In this tutorial, we learn how to turn an old scarf into a purse with Threadbanger. First, you will grab your old scarf and tie it at the ends, making a knot. After you have tied each of the ends, bring the opposite ends together and tie them together into a knot. After this, do the same on the other side. Now, you will have two handles and a hobo type of purse to carry around! This is a great way to use a scarf that you aren't going to wear. You can make this however you would like using dif...
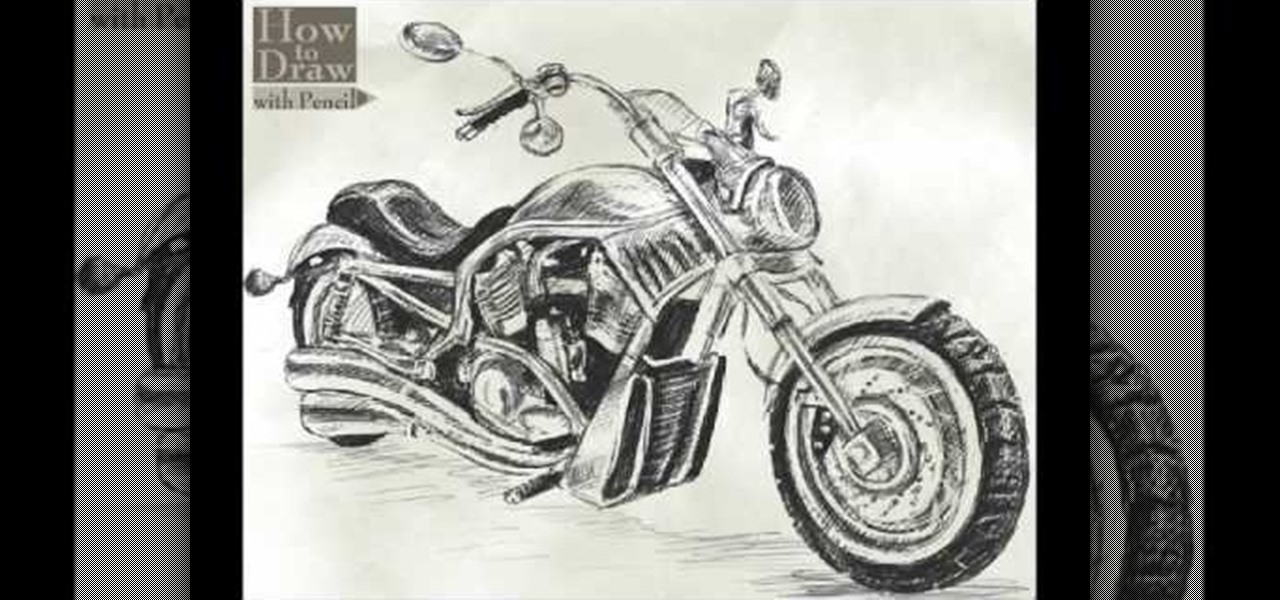
How To: Draw a Harley-Davidson V-ROD
In this video, we learn how to draw a Harley-Davidson V-ROD. First, draw the outline of the vehicle using a light pencil. After this, start to add in the details of the wheel and front of the motorcycle. From here, add in shading and additional details to make it look more realistic. Make sure you draw on the small details of the motorcycle because this will make all the difference. Shade in additional details on the drawing and then erase any lines that you don't need. Use the eraser to crea...

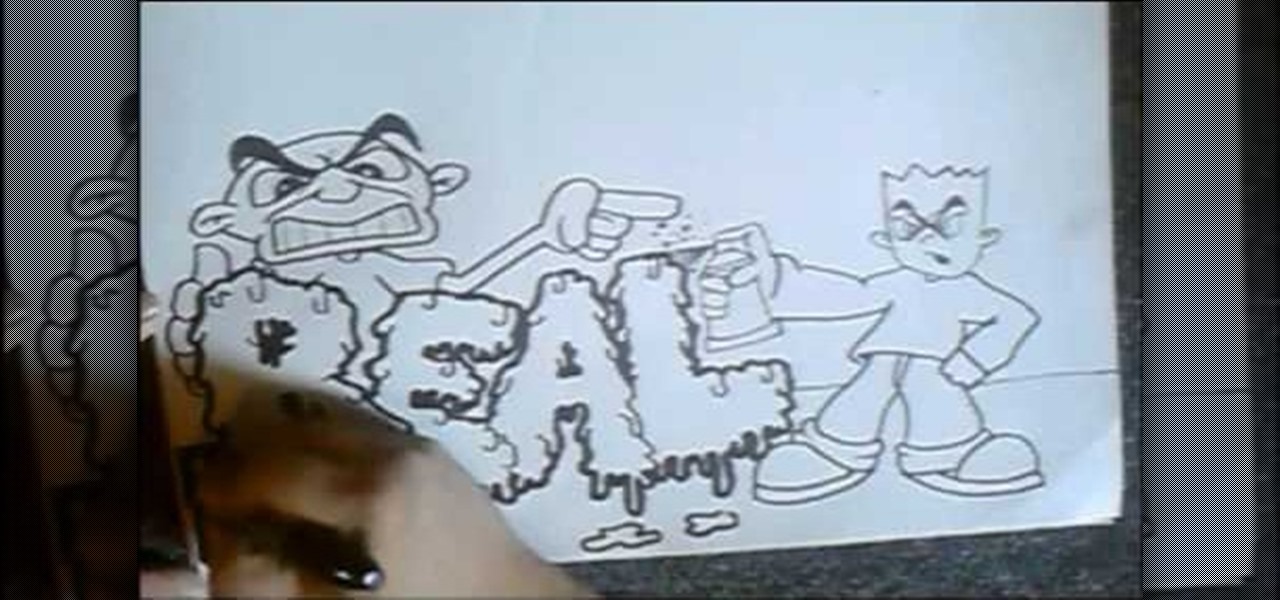
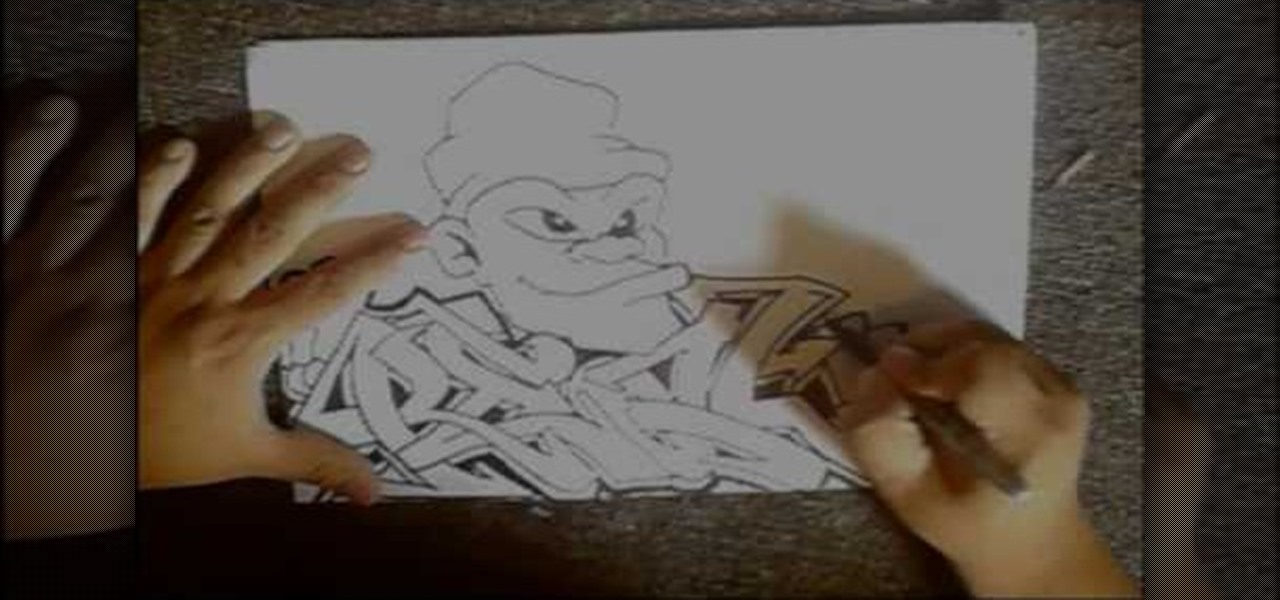
How To: Draw a gangster M&M graffiti character
In this tutorial, we learn how to draw a gangster M&M graffiti character. Start out by drawing the eyes and the mouth for the character. Fill in the eyes and the mouth, then add in more details. Next, add in eyebrows to the M&M, then draw the body around the face. Draw a beanie hat on top of the head, then draw arms with a spray paint can in one of the hands. Add in the additional details for the hands and arms, then draw in the legs on the bottom. Add in the shoes, then finish with additiona...

How To: Draw an eye step by step
In this video, we learn how to draw an eye step by step. First, draw the curve of the eye on the top and on the bottom. Then, draw in the pupil of the eye and the inner corner of the eye. Use a light touch with the pencil to make the circle in the middle of the eye. Then, draw around it with a bolder line. After this, draw the crease above the eye, then draw shading to show where the crease line is. Next, fill in the pupil and add in a circle to make the eye appear glossy or that light is hit...

How To: Draw a KTM X-BOW "ROC" car
In this video we learn how to draw a KTM X-BOW "ROC" car. Start out drawing the outline of the car, adding in the details for all the areas. After this, shade in around the tires and on the hood, back, front, and sides of the car as well. Then, add in dark shading to the areas that you originally shaded. Fill them in completely so it's black, then use the eraser to crease a highlight on the different areas of the car. When finished with adding details, you will have a great drawing of a uniqu...

How To: Draw eyebrows and eye lashes
In this tutorial, we learn how to draw eyebrows and eye lashes. First, sketch out the basic shape of the eyebrow. Cross edge with a 2B pencil, then blend it in to lighten in and act as a skin tone. Then, draw the actual hair with a B pencil, going upwards with the pencil strokes in the front area. For eyelashes, you will sketch out the outline with a 2H, then draw the eyelid and the hairs for the lashes. Draw in the direction and the shape of the eye to give off the illusion that it's round. ...
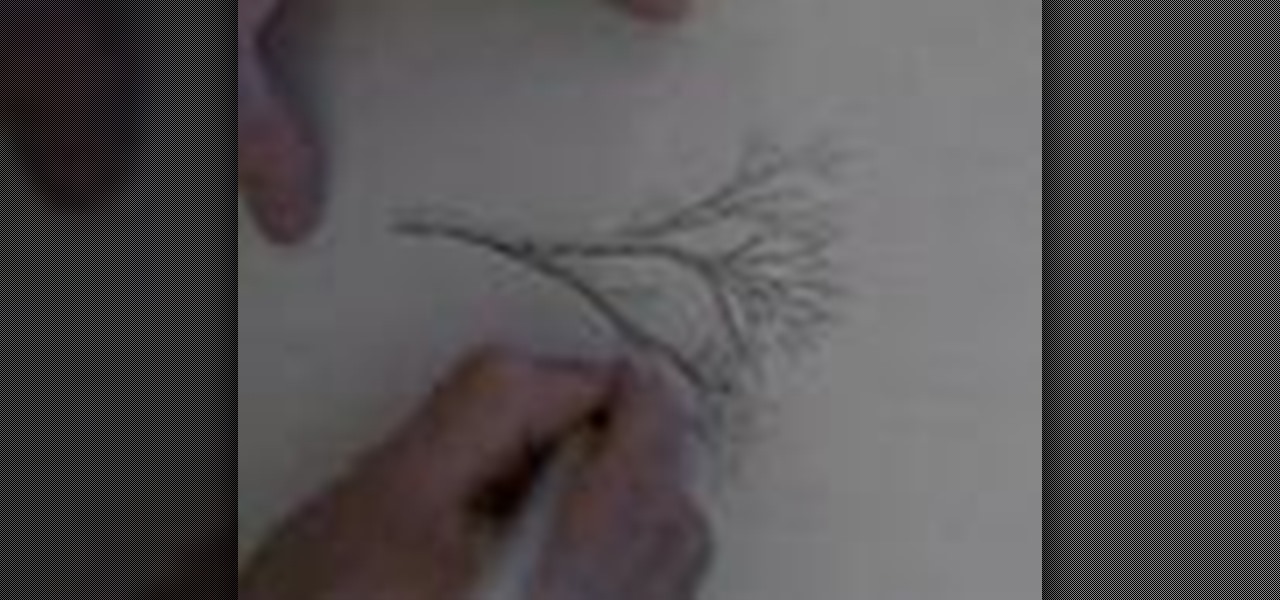
How To: Draw a tree branch
In this tutorial, we learn how to draw a tree branch. Start out drawing two lines for the trunk of the tree. Work these lines up until you reach the top where the branches are located. Then, draw outward lines that will be the branches. Do not make all of them the same size. You want this to look realistic, so make them all vary in size. Draw small lines at the tip of every branch to make it look like wood coming off of them. When finished, add in lines along the branches to show bark on them...
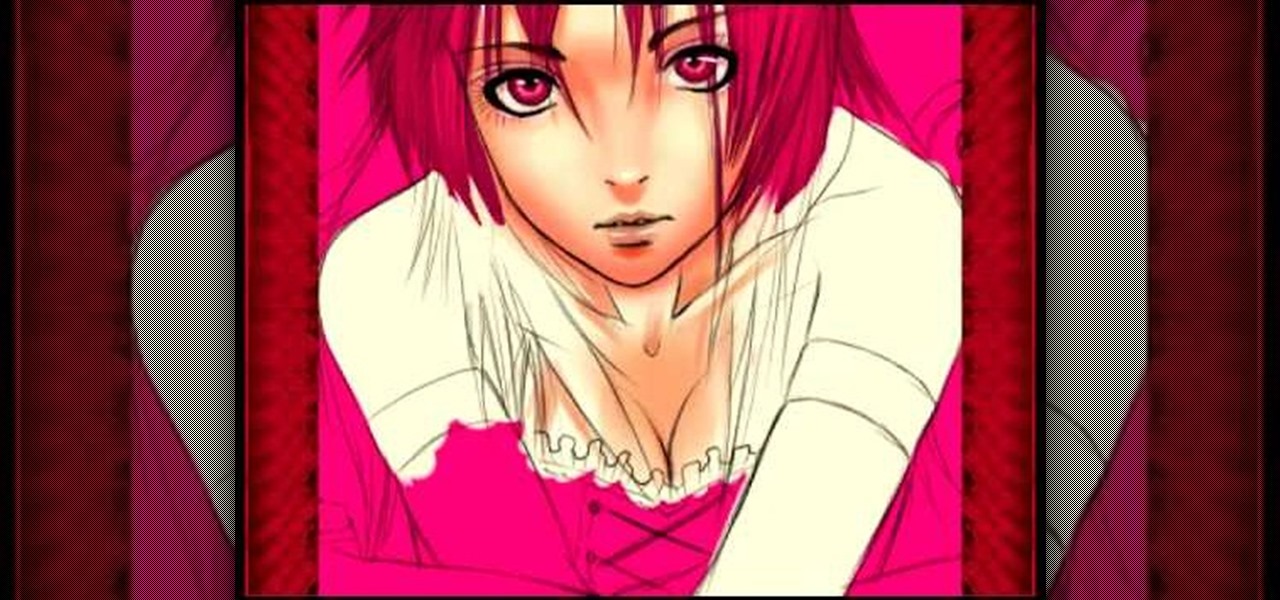
How To: Color manga
In this video we learn how to color manga. For the girl, start by coloring the entire drawing pink. Then, remove the color from the face and add in shadowing and colors for the lips and eyes. Then, color in the color of the face and the hair as well. Color in the skin color and draw in black lines to show where the contours of the body are at. Color in the shirt pink with black lines to show where it's being laced up at. Darken up any of the features of the face, then save this to finish.

How To: Draw a graffiti spraycan
In this video, we learn how to draw a graffiti spray can. Start out by drawing the top of the can with the nozzle on the very top. Use a half circle with a thick line under it to make the top. Next, draw the rest of the can creating a face on the side of the can with a mouth, nose, ears, and eyes. Then, draw in the bottom of the can using a circle shape and filling it on black so it looks sealed. Add in some lines to show the can spraying, then write in graffiti letters underneath to finish!
How To: Create a bucket drum or protest art
In this video, we learn how to create a bucket drum or protest art. To start, you will grab a large plastic bucket and you will apply take all around the sides of it so it's wrapped up. The tape should be intersecting at the opening of the top of it. Then, use a tie to connect this in with the tape and then size it so it fits around your waist. From here, you will tie the bucket to your waist and then use sticks to beat your new drum. You can stick the sticks to the side where the tape is to ...

How To: Make a Kufi cap with Threadbanger
In this tutorial, we learn how to make a Kufi cap with Threadbanger. First, grab a thick black jersey material and your added material of choice. Cut the fabric in a circle pattern to make the size of your head. Then, cut the band material for 3 inches longer then your head measurement. Fold the material and create the bands with thick cardboard. Once you do this iron the bands down and then fold the added material down as well. Adhere the piece pieces together while still folded, then sew th...

How To: Draw a nose using simple methods
In this video we learn how to draw a nose using simple methods. Use a grid to start sketching out your drawing. Note the dark and light areas by outlining them on your paper. Then, crosshatch the first layer using whichever method works the best for you. Then, use a tissue to blend the pencil marks in with each other and create a lighter shade. Grab your darker pencil and mark on the darker areas of the nose, then start to shade in darker then before. To finish, use your pencil to add in the ...
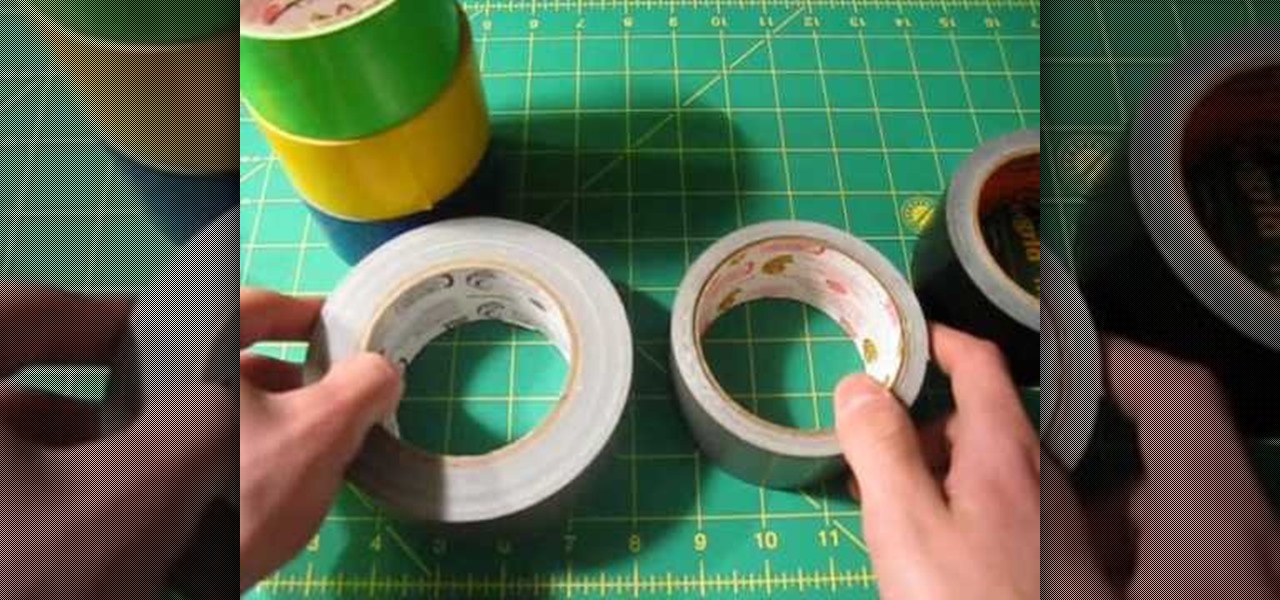
How To: Choose the right duct tape for craft projects
In this video, we learn how to choose the right duct tape for craft projects. There are many different choices for colors of duct tape available, so you can choose this by the preference you have. There is also craft duct tape and professional duct tape. The craft duct tape is good for projects and the professional is good for making a book bag or something larger and more heavy duty. The Gorilla Tape is very thick and should be used on projects where they are not supposed to bend very much. ...
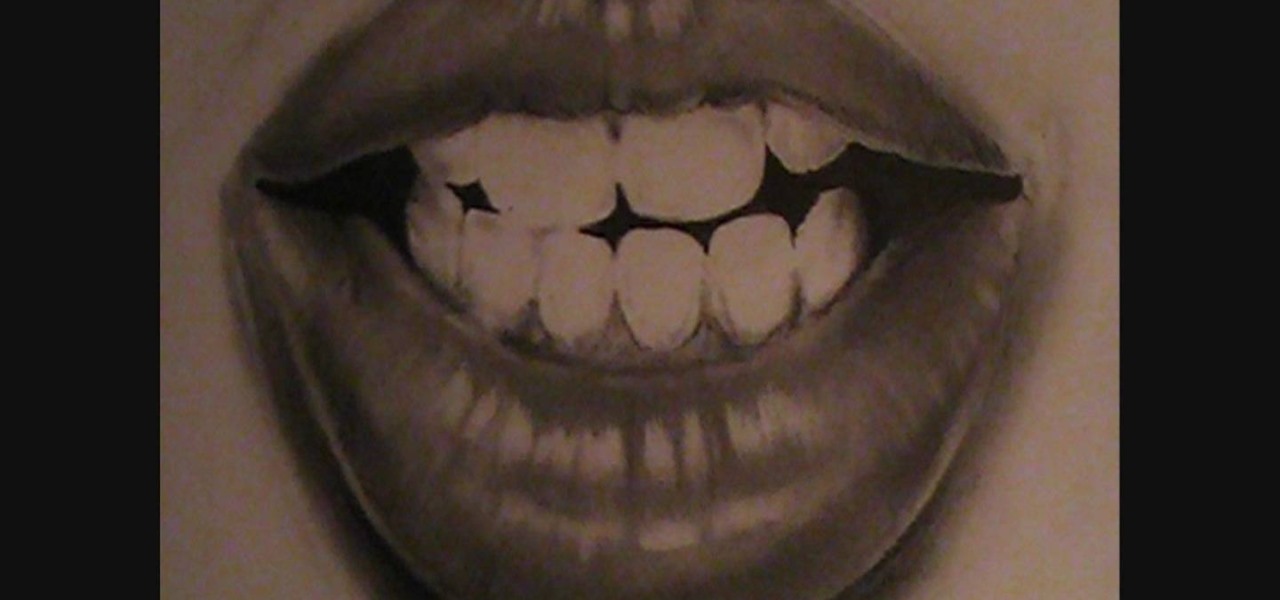
How To: Draw lips and teeth
In this tutorial, we learn how to draw lips and teeth. First, you will need to draw the sketch or outline of the picture. You will need to make sure you take your time to create realistic lines for the lips and the teeth as well. From here, you will add in more lines on the lips to make it look more realistic. Then, add in the teeth in the middle of the lips and shade in the areas that are in between them. When you are finished with this you can add in more shading and lines into this and you...
How To: Make an advanced duct tape wallet with pockets, card slots and change purse
What's the cheapest wallet you can afford? With today's prices, you're better of with a DIY wallet, and the best material for the job— duct tape. This two-part video will show you the short steps to making a duct tape wallet that has everything— bill pocket, card slots and change purse. This is a fully functional duct tape wallet! Give it a try.

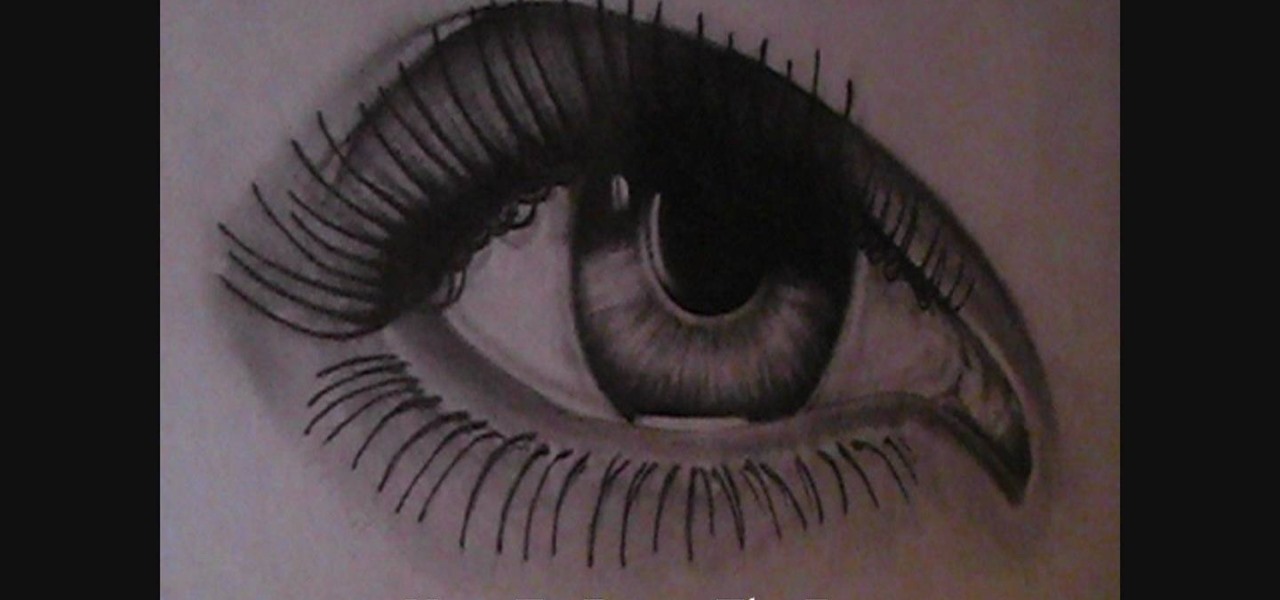
How To: Draw eyes with pencil
In this tutorial, we learn how to draw eyes with a pencil. First, draw the outline of the eye, giving it an almond type of shape. From here, you will add in the lines to the eyes and shade it in to make it look more realistic. Add in the crease above and below the eye, then draw another line on the bottom for the lash line. Then, darken in the areas around the eyes, then add in the lashes to the top and the bottom of the eyes. Shade in the pupil, then use lines to create a more realistic insi...
How To: Draw graffiti in pencil
In this tutorial, we learn how to draw graffiti in pencil. Start out with a white piece of paper and a pencil. Then, draw your character's face, adding in the details of the face and the features of the face. Underneath this, shape out your letters that you want to write out. Cross the letters together, and make sure they are all touching each other. Shade in the areas next to the letters and add in lines and darker edges to the sides of them as well. Add in black in between each of the lette...
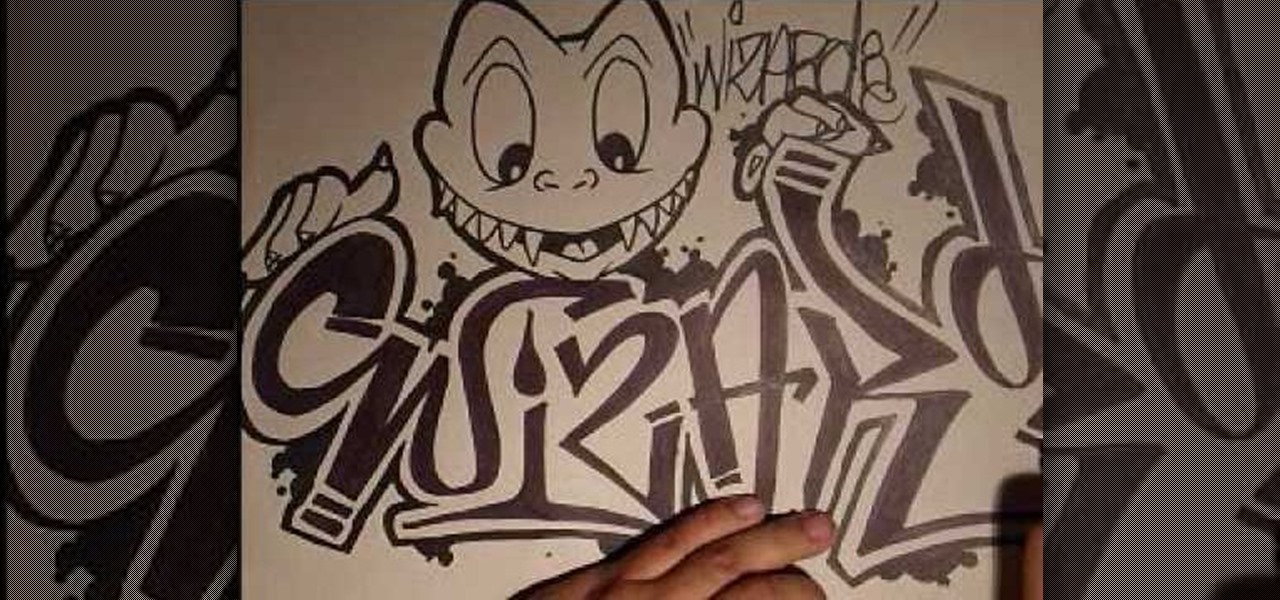
How To: Draw a graffiti character
In this video, we learn how to draw a graffiti character. Start out by drawing two large eyes with small pupils at the bottom of them. Next, you will draw a nose and a mouth with pointed teeth. From here, you will draw the head around this and the jaw line for the mouth. Shade in the mouth and add lines to the face, then draw graffiti letters for the name of the character right underneath it. When you draw the letters, make sure to drag the letters out to make them flare more and stand out. W...