

Active Fine Art Posts


How To: Draw grieving or mournful facial expressions
Grief is a particular painful kind of sadness that can sometimes be difficult to capture in a simple pencil sketch. This tutorial shows you how to perfect mourning facial expressions using a few good techniques and showing you how to shape the features.
How To: Make a cute ruffled holiday dress without a pattern
You can make this dress easily and without needing a pattern at all. This has been made using white fabric, but you can use any color or pattern that strikes you - use a holiday print for some extra festivity!
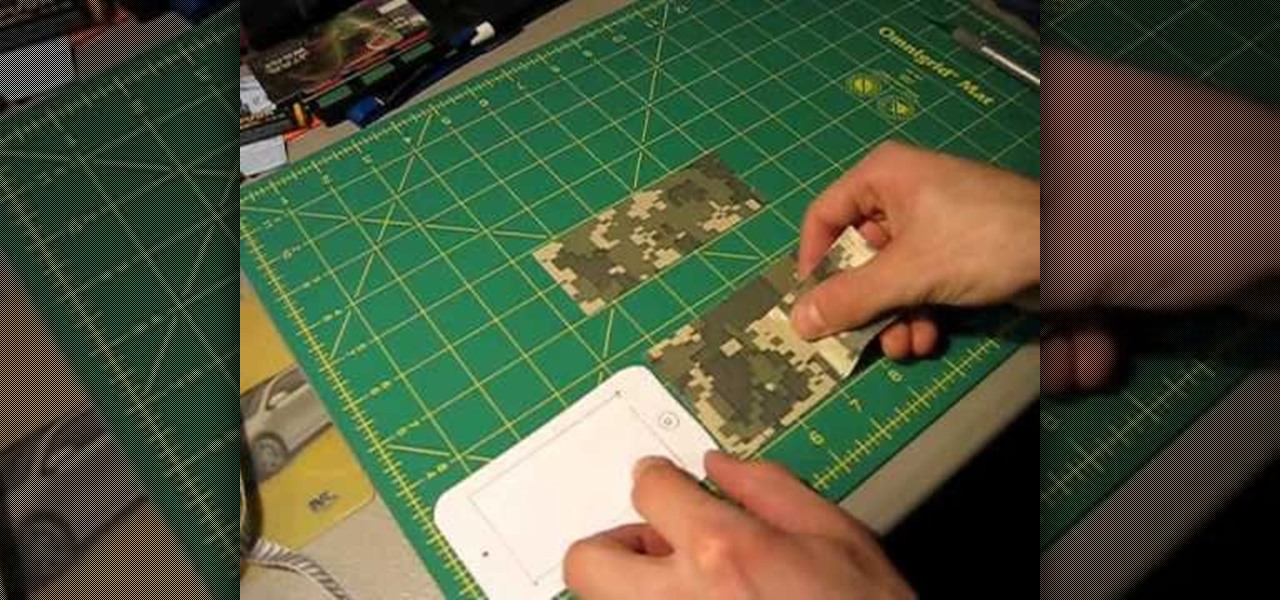
How To: Effectively cut duct tape for your duct tape crafts
Any duct tape project starts with pieces of duct tape that have been cut with clean, sharp edges. But how you can you get that for yourself? This tutorial shows you how to use craft knives and cutting mats to perfectly cut your duct tape.

News: Madison Square Park's Eerie, Electrifying LED Ghost Land
Engineer-turned-artist Jim Campbell's recent installation "Scattered Light" converts New York City's Madison Square Park into a ghostly world of light bulb pixels. Campbell dangled 2,000 floating LED light bulbs programmed to display shadowy human silhouettes passing by.
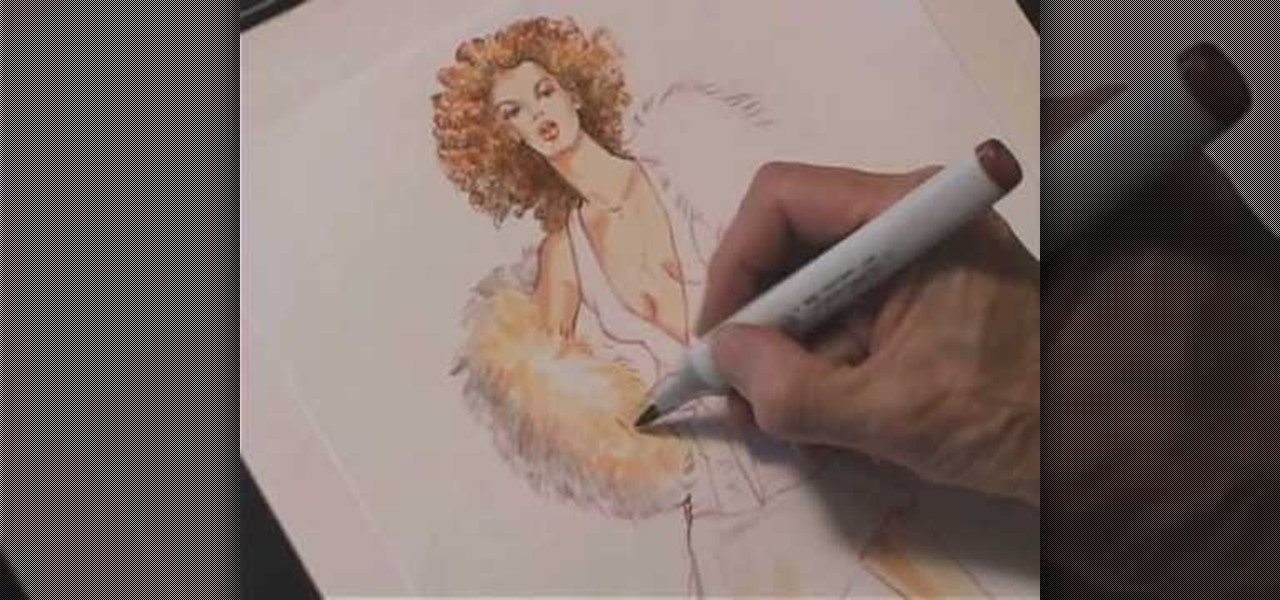
How To: Fashion sketch satin
In this tutorial, we learn how to fashion sketch satin. When you are sketching satin, you would to make sure you use the right colors and the side of the pencil. You will need to use the side of the pencil to shade in small areas to create creases and folds in the clothes. Then, you will use the eraser to make white in the middle, which will create a shine on the skirt. Color in the rest of the area around the piece of clothing. It doesn't have to be perfect, just make sure you shade and use ...
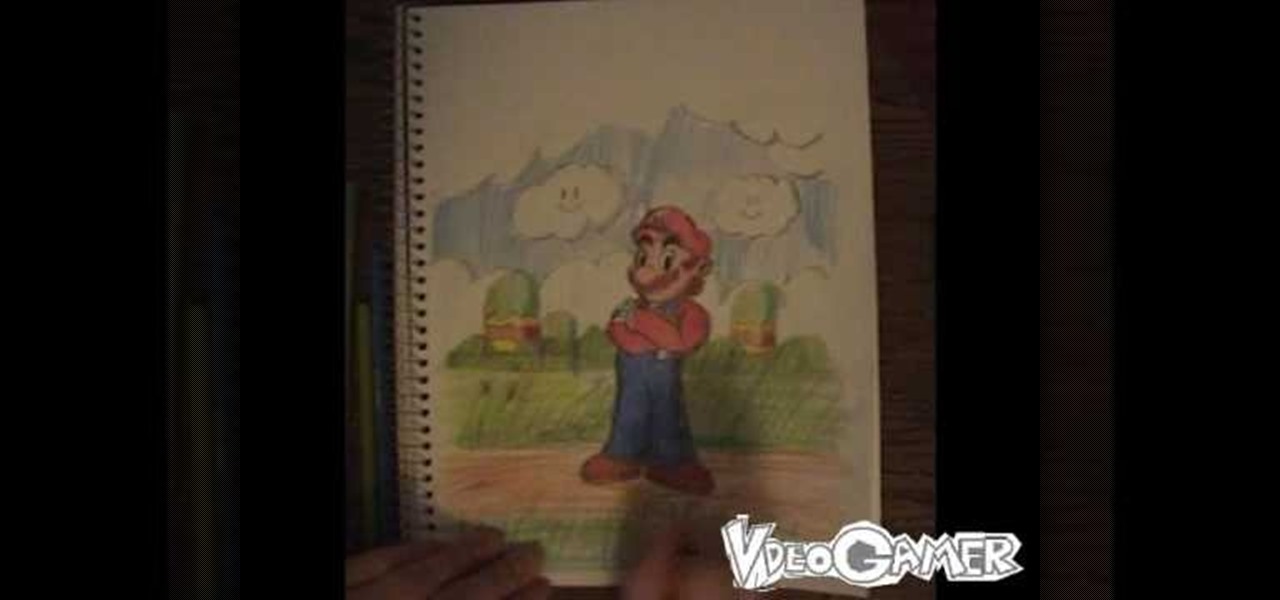
How To: Draw video game characters like Mario
The video begins by explaining the characteristics of the video game character Mario. The narrator begins by finding a sample picture to use as a starting point to mirror for accuracy. The first part of the character Mario drawn is the head and facial features. After finishing a simple outline of Mario's Face is to begin the outline of the characters body. After the basic outline of Mario is finished the excessive lines must be erased to give me lively hood to the drawing. One of the last ste...

How To: Photograph a pregnant mom
In this video, we learn how to photograph a pregnant mom. Try taking a shot of the woman outside, this will feature her stomach and show off the glow of her skin as well. Process it after you have taken the photo to edit it further. Drape a sheet around the woman as well, which is a really popular photo technique as well. Take fun shots with your partner, animals, other children, and around the house! The camera can focus on different things to show multiple subjects in the scene. Be creative...
How To: Draw the original 8-bit Mario
This video shows how to make the original 8-bit Mario using only pixels. The first step is to use three dark brown pixels to create a stair like shape for Mario's feet. The next step is to create his pants by making a 6x6 red square which is attached to the characters feet. The body and arms are created making the same sized red square out of pixels. The arms are made as various straight lines which are made up of about four pixels each. the last step is to make a 4x4 tan colored square for t...
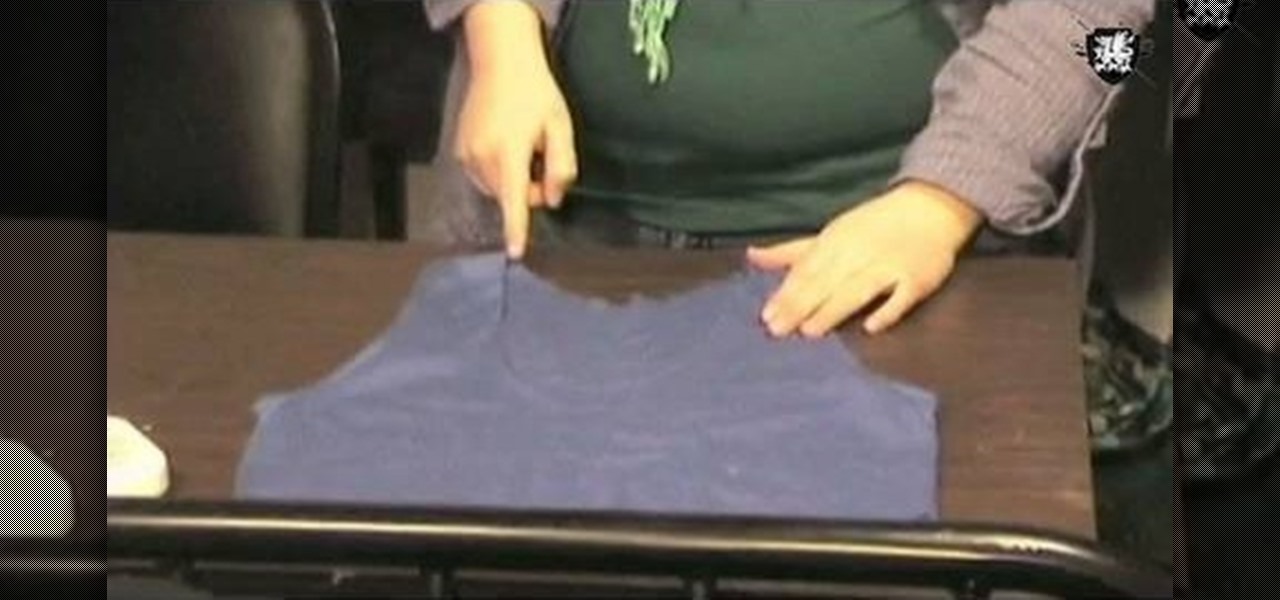
How To: Make a summer party dress with Threadbanger
In this tutorial, we learn how to make a summer party dress with Threadbanger. First, take a tank top and mark right under your boobs with a pencil. Then, lay it down on the fabric you want to use and outline it, making sure there is extra seam allowance. Cut one that will be your back and the front. Next, cut off the bottom of the two pieces that you cut, making sure you leave extra allowance again. After it's cut out, sew them all together to make a cute dress for the summer! Adorn with any...
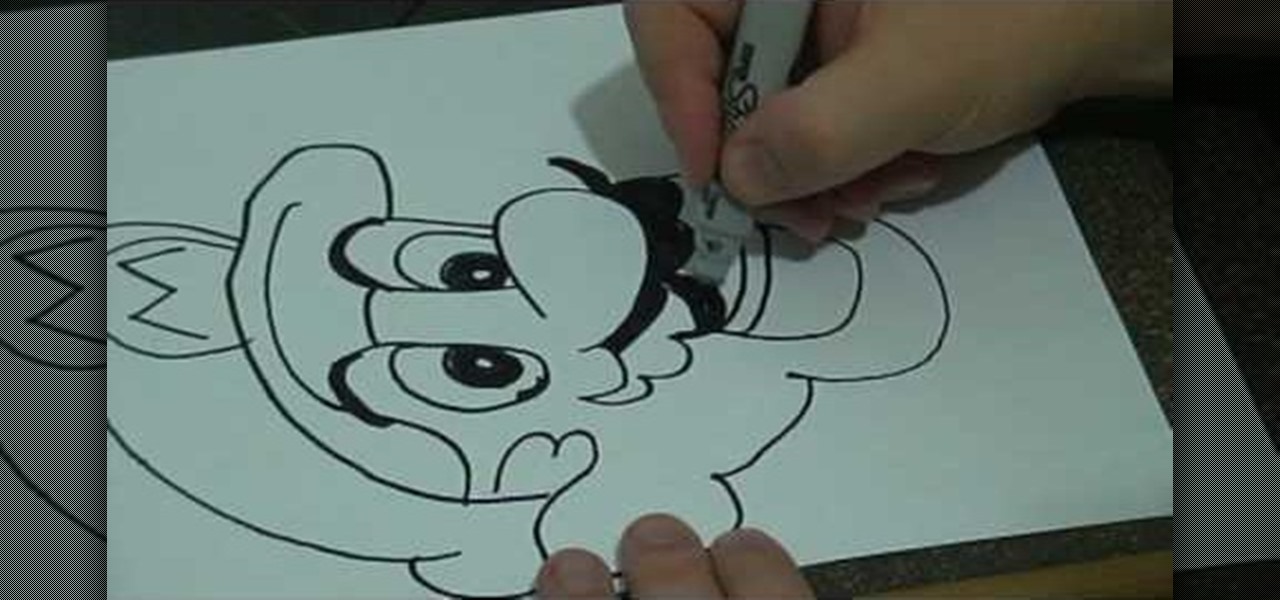
How To: Do a basic line drawing of Mario from Super Mario Bros.
In this tutorial, we learn how to do a basic line drawing of Mario. To start, draw the basic outline of the face with a black marker. Draw in the details of the mouth, don't forget the teeth, tongue, and inside of the mouth. After this, draw in the nose and then the eyes. Draw in the pupils and then start to draw in the mustache and eyebrows. After this, create the hat and then draw around to the side of the head to draw the ear in. When finished, you can leave empty or color in with appropri...
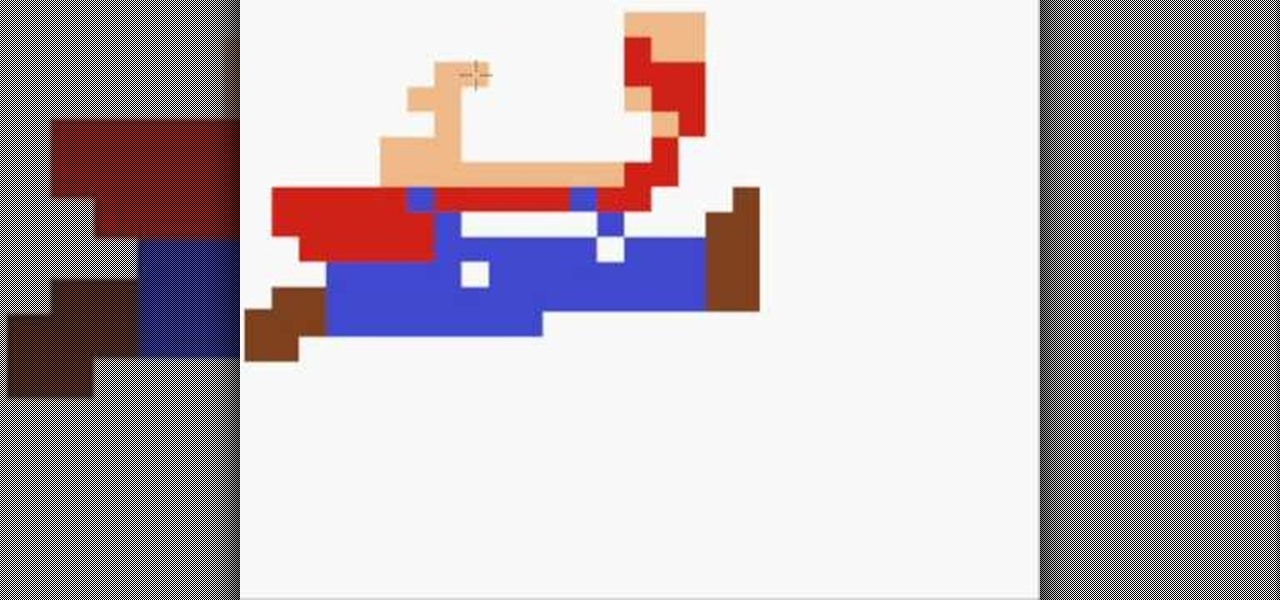
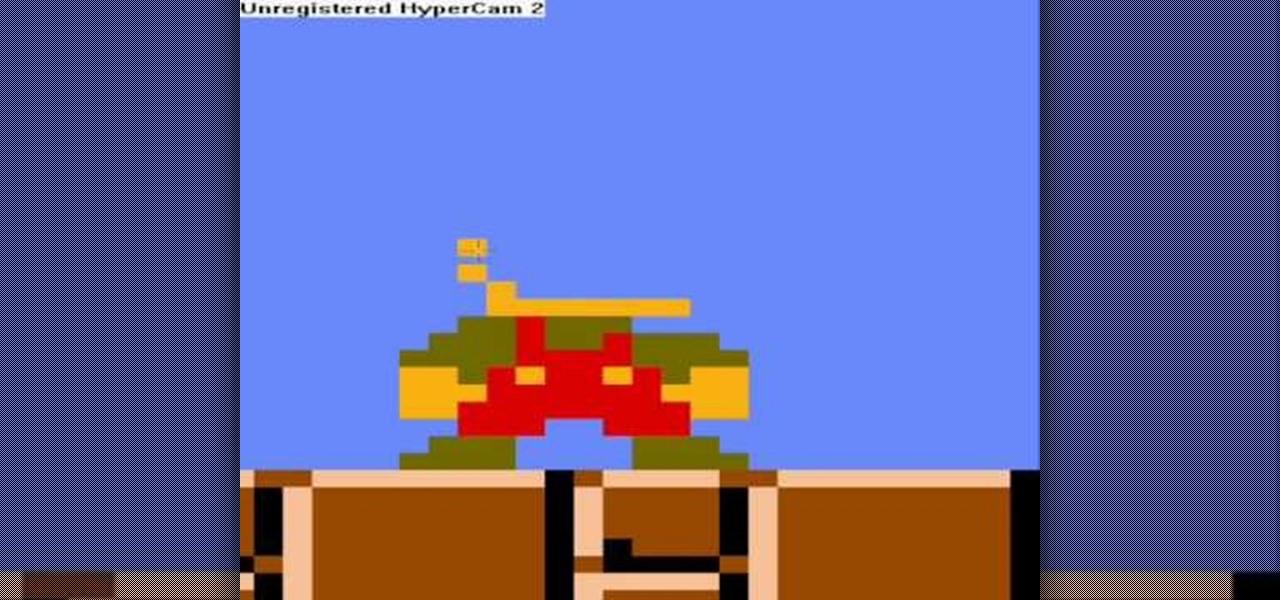
How To: Draw an 8-bit Super Mario jumping
In this video, we learn how to draw an 8-bit Super Mario jumping. To start, you will use a square paint tool on your computer to create rectangles on the blank sheet. Use red, tan, brown, white, and blue to create the character. Use the square too to draw in the shape of Mario, making his legs spread apart to show he is jumping. Use white to create open space and make sure to show the edges of the squares to make the drawing more realistic. When finished, add in any additional details, then y...

How To: Quickly draw Shadow the Hedgehog
In this tutorial, we learn how to quickly draw Shadow the Hedgehog. First, you will need to draw the outline of Shadow, drawing in the entire body. After this, darken up the lines to make the final outline of the character. Next, draw in the details of the face and the body. Then, shadow in the sides of the character and create more details to make him look more realistic. When finished, you can choose to color him with the right colors or just keep it shaded. Add in more details if you need ...

How To: Make a hippie chiffon one shoulder top
This is a video tutorial in the Fine Art category where you are going to learn how to make a hippie chiffon one shoulder top. The materials you will need are chiffon, studs, elastic thread and elastic. Use a simple tank top pattern to cut out the chiffon. Elongate the center of the fabric; this will give it the flowy look. Shirr 5 rows into the middle of the fabric making sure the elastic is on the wrong side of the fabric. Fold in half, right sides together. Sew the side seam and the shoulde...
How To: Draw detailed hair
In this tutorial, we learn how to draw detailed hair. When you are drawing hair, you must remember to draw with the shape of the head not just the lines. You should also draw in the lines curved and feather them to show the different strands on the head. When drawing a guy or girl, draw different lengths in the hair and show the waves on them as well. For girls, when you are drawing curls you must make them ring shapes so they curve like curls. Just make sure you draw enough lines to show the...

How To: Draw children's heads
In this video, we learn how to draw children's heads. For the front view, first draw an oval with a slight point for the chin. Then, draw in the features of the face lightly with the side of the pencil. After this, start to shade the side of the eye in. The child's eye has a large eyelid, larger than an adult's eyelid. The pupil should also be large. For a side view, make sure to show the curves of the chin, nose, and lips. The eye should be soft and the ear should be soft as well. Fill in th...
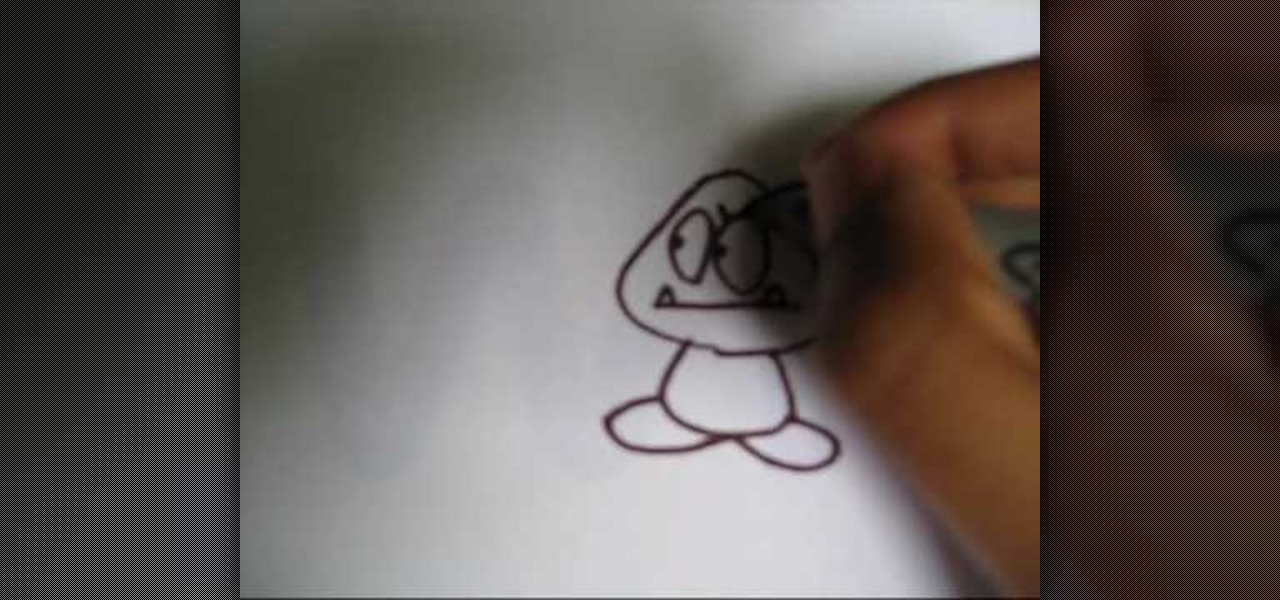
How To: Draw a Goomba from Super Mario
In this tutorial, we learn how to draw a Goomba from Super Mario. First, draw the softened triangle shape of the top of the head, then draw the body and the oval feet at the bottom. After this, draw on the oval eyes and then a flat mouth with two triangle teeth on both sides. From here, draw on the eyebrows to Goomba in thick lines. To draw another type of Goomba, draw the same basic shape, but then make the eyes squished into small lines and then draw the mouth with crunched teeth on the ins...
How To: Make an iron on transfer for a t-shirt
In this tutorial, we learn how to make an iron on transfer for a t-shirt. The materials you will need are: a printer, an iron, hard surface, transfer paper, and t-shirt! To start, find the art that you want to put on your picture and then you will need to transfer it onto the paper for your shirt. Once this is fully transferred with the scanner, load it to your computer. Then, print it out on transfer paper. After this, you will place the paper down on the shirt and iron it for a few minutes....
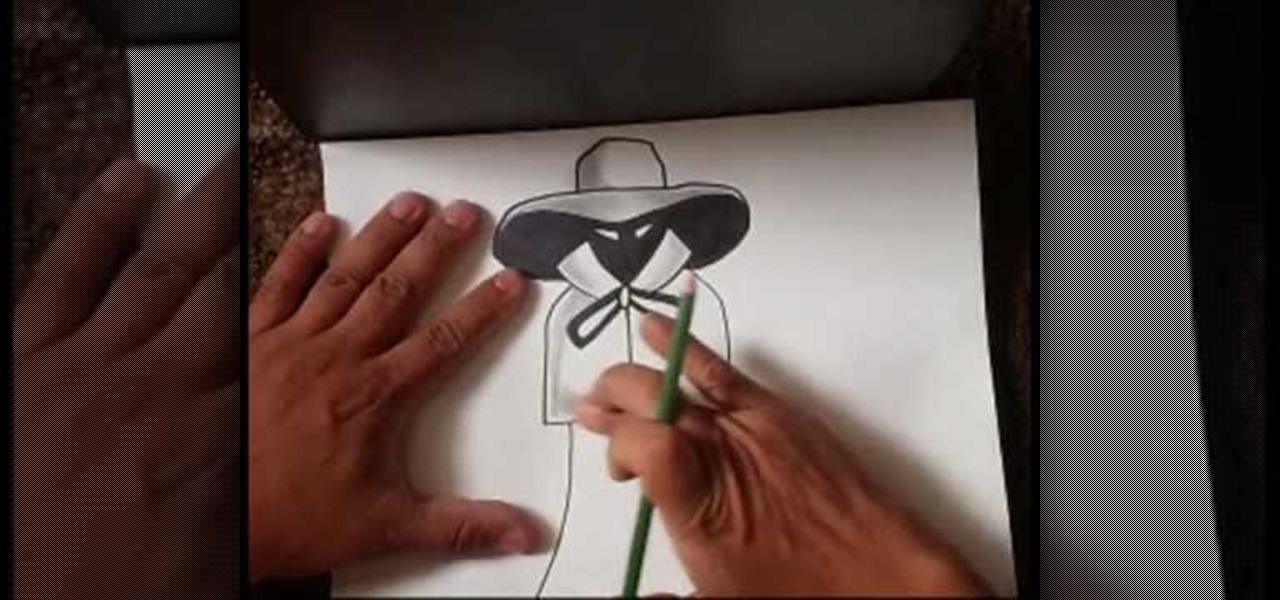
How To: Draw a scary character
In this tutorial, we learn how to draw a scary character. First, draw the outline with a hat and a cape. After this, use your pencil to color the inside of the hat and the face (except the eyes) completely black. From here, you will shade in the hat by blending in the pencil with your finger. From here, you will color in the bow on the front of the cape and then shade in the sides and the top and bottom of the cape. Use your finger to blend in the pencil and then smudge it around the front of...

How To: Master technique when drawing hair
The first step in this video is to draw a rectangle on a piece of paper to gauge the length of the hair stokes. The artist then makes long pencil marks along the inside of the rectangle that are much less defined towards the middle. It is explained that you need to go in one direct with your pencil strokes as going back and forth gives an unrealistic final product. It is shown that you must begin at the beginning of the hair source and bring the strokes downwards for more realism. Four exampl...
How To: Take better photos by understanding depth of field
In this video from clickherephotography we learn how to take great photos by using depth of field. In a picture of a bird he used an aperture of about 5.6 which increased the shutter speed on a 300mm Canon lens. With depth of field you can blow your background out. If you used a higher aperture, a lot more of the bird would have been in focus and a bit of the background would have been in focus. By using an F-stop and this aperture, you really bring the bird or whatever object is in the foreg...
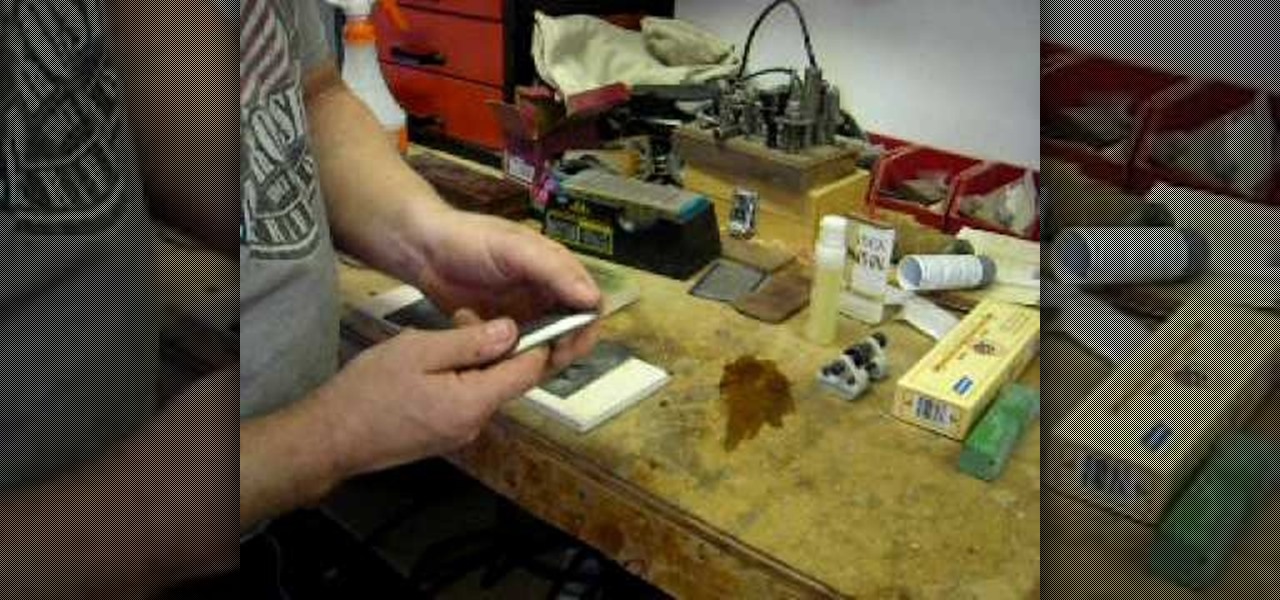
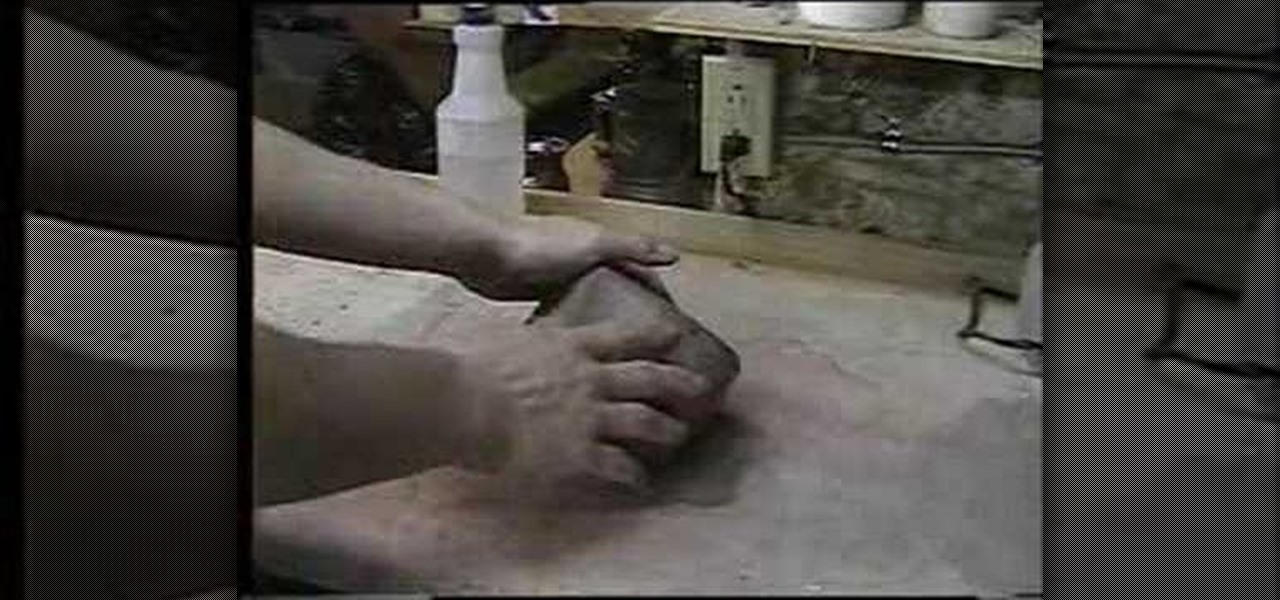
How To: Sharpen your chisel inexpensively
In this tutorial, we learn how to sharpen your chisel inexpensively. This is an art you have to learn if you are going to have to learn to work with tools. To start, you will first need to lay down a piece of paper down on a block of wood. After this, lay a piece of grit down on top of the and grab your chisel. Spray the grit with some water and then use the bevel on the chisel to move it around. Use your body to move the chisel, not just your hands. Continue to do this around the sides until...
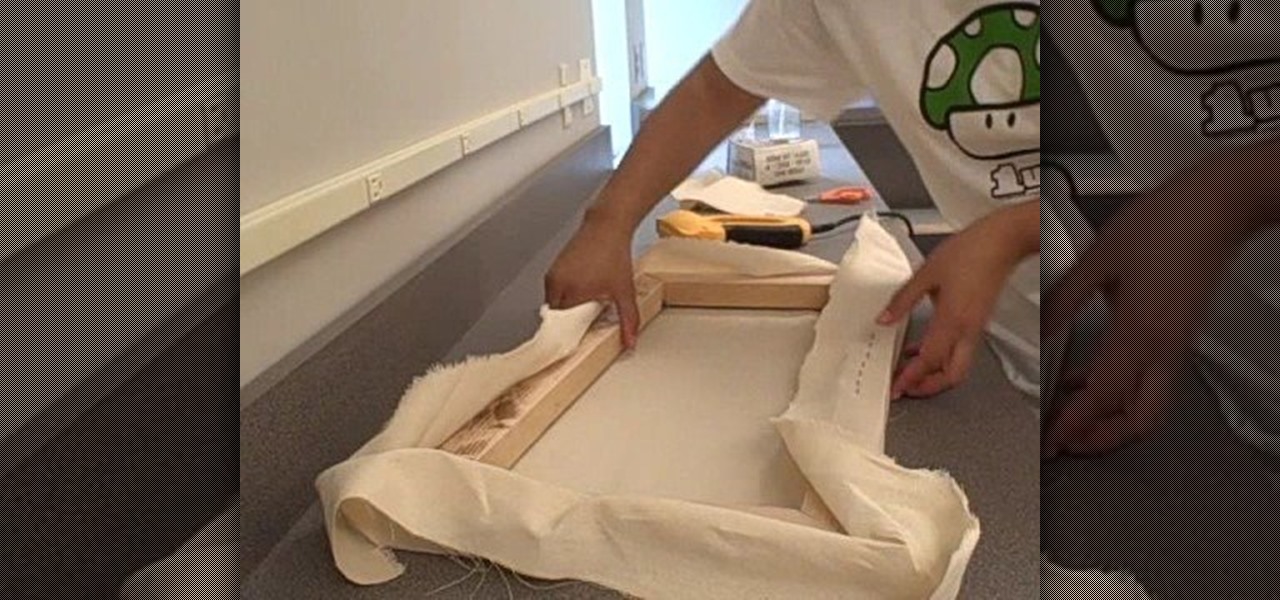
How To: Stretch your own painter's canvas
This video begins with an unfolded painter's canvas unfolded on a table and a frame which will be used to stretch and mend the canvas. The canvas needs to be laid beneath the wooden frame. The canvas must then be stretched over the sides of the wooden frame and then stapled into place. After the canvas has been stretched and stapled over the wooden frame you can pull the corners to tighten the canvas fabric. After the canvas is being stretched within the frame you must let it sit until it bec...
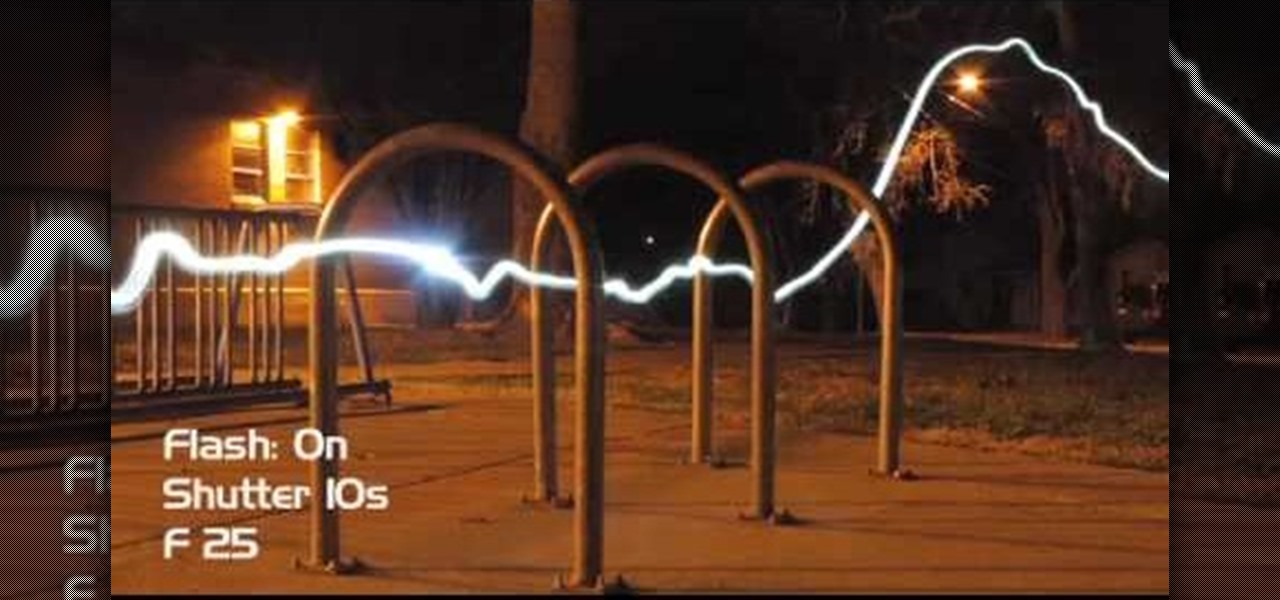
How To: Do night photography with your kids
In this video, we learn how to do night photography with your kids. Glow sticks. flash lights, and ghost images are great for night time! First, put your camera in the manual mode and then learn how to set the shutter once you're in manual mode. Put the pop up flash on your camera, then get started taking pictures! Use glow sticks to take pictures of the children, giving a cool effect on the photos. Use different shutter speeds on the camera to capture the sparks on the glow sticks and with s...
How To: Stretch a painting canvas
This video begins by showing what a folding painting canvas looks like and what the final stretched canvas should look like. The first step shown is to make sure the bars are measured and marked with a simple A and B for easy measurement recall. After a wood frame is added over the canvas you must fold the material over the back of the wood and nail in place. Once the canvas is nailed to the frame you must add A, B, C and D markings to continue proper alignment procedure. The last step shown ...

How To: Draw the 8 bit Super Mario
In this tutorial, we learn how to draw the 8 bit Super Mario. First, use a ruler to make a rectangle on the bottom of the paper, then color it red. Make another one under that, larger than the first. Then, continue to make rectangles under each one, making the shape of Mario's face with just rectangles. Color in the rectangles with a tan color, red color, and burgundy color. Continue all the way down the page until you have created the character's entire body. When finished, color in the rect...

How To: Draw Naruto & Hinata
In this tutorial, we learn how to draw Naruto & Hinata. First, draw the outline of the head and then draw the hair and bangs on the top of the head. After this, draw in the eyebrows, eyes, nose, and mouth. After this, draw in the neck and then the rest of the body. Draw in lines to show the folds for the clothing and then draw the body of the other character around this one. Draw Hinata in the same way as you drew Naruto, just make sure to make their faces and hair different. When done, you w...
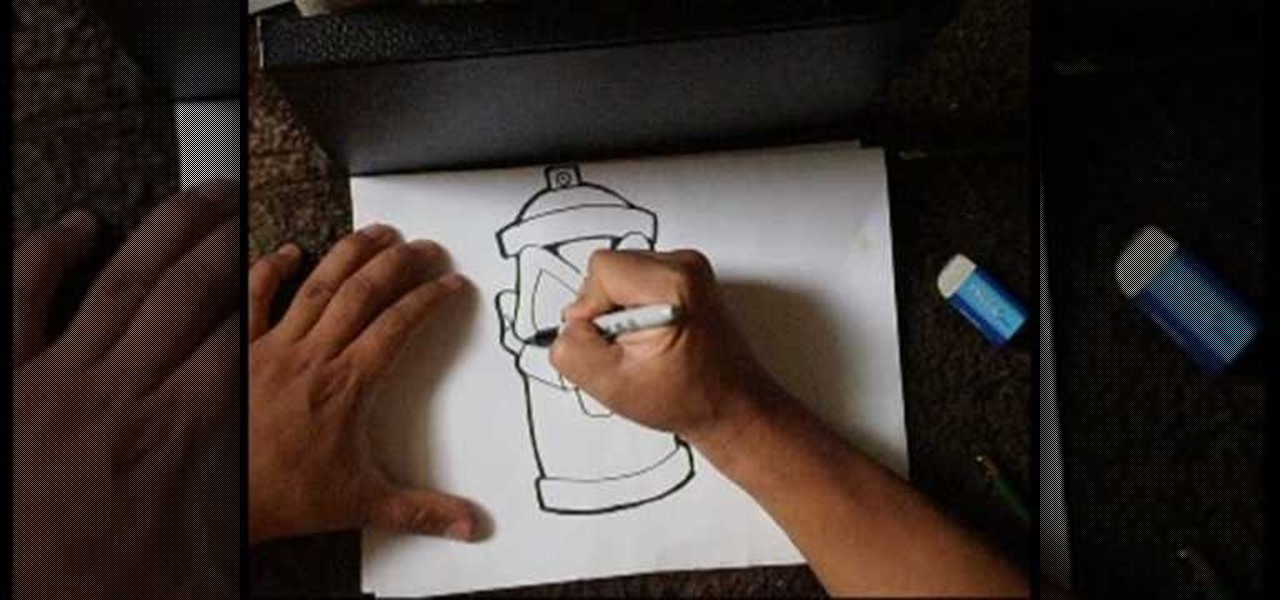
How To: Draw a spraycan sketch
In this tutorial, we learn how to draw a spray can sketch. First, draw the face of the can on the piece of paper, drawing the eyes, nose, and mouth. After this, draw the surrounding parts of the can around the face. Draw the bottom and the top of the can as well as the top with the middle open area where the spray will come out. After this, draw in as much detail as you would like on your spray can. Use a black marker to shade in on the sides and make lines darker. When finished, save and enj...

How To: Draw Sonic the Werehog
In this tutorial, we learn how to draw Sonic the Werehog. Start by drawing the outline of the character, making sure to draw in the spiked hair on the back of the head. Then, draw in the circle for the head and use crossing lines to reference where you want the features of the face to go. Draw in the features and then add in more detail to them as well. Erase the background lines and then draw in the details of the body. From here, color in the body and then shade in corners to make it look m...

How To: Draw Naruto Sage Mode
This video contains different techniques to draw Naruto Sage Mode. The first step is to draw the basic outline of the characters face along with the ears and nose. After completing the basic outline the eye outline and details are then placed. The Lips and nose are drawn third to finish the basic features of the character. Dark shading around the eyes must be completed to give Naruto sage mode more realism and detail. The hat is one of the last parts of the character created involving a simpl...
How To: Do a simple Mario drawing
In this tutorial, we learn how to do a simple Mario drawing. First, take your pencil and start to draw the outline of the head. After this, you will draw in the mustache, nose, and mouth on his face. From here, draw in the hat on the top of the head and then draw in the eyes as well. Add in shading and lines to create additional details and depth in the drawing as well. Continue to draw in the body and the overalls that are on the body as well. Finish off with the legs and the shoes and then ...
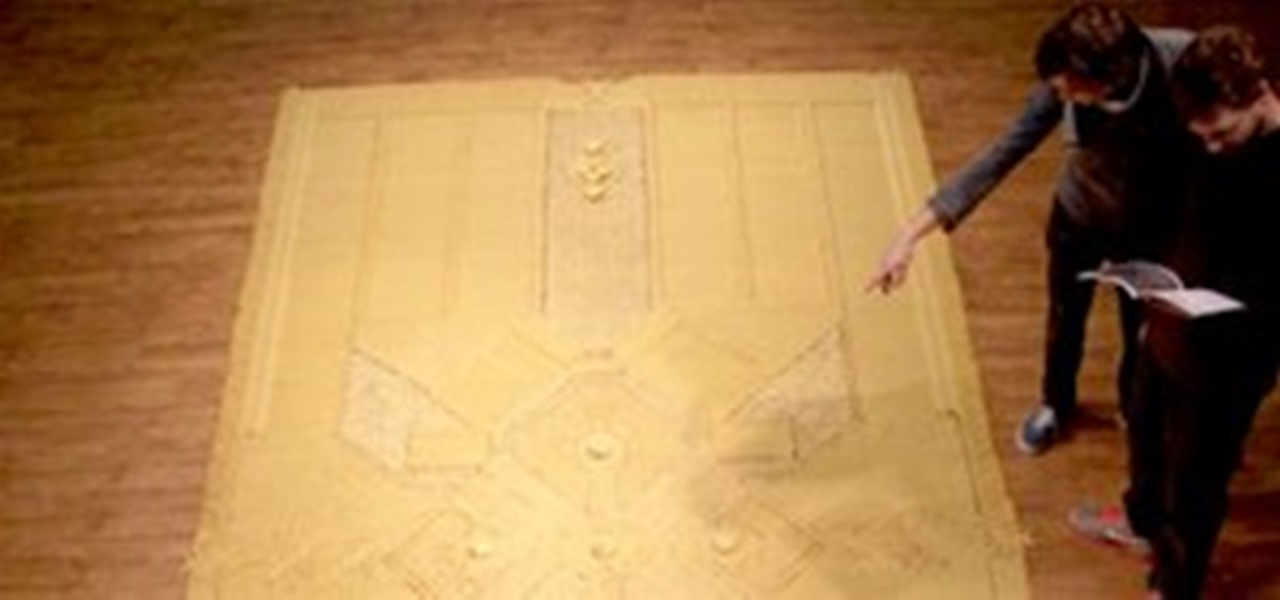
News: See a Woven Rug? Look Again
Dutch designers Marcia Nolte, Stijn van der Vleuten, and Bob Waardenburg are the masters of illusion behind We Make Carpets. Look, then look again. What you initially see isn't what it appears to be...

How To: Draw a realistic picture of a person running at you
This is a useful drawing tutorial, but also a good lesson on perspective. Whether you want to improve your skills as a sketch artist or are looking for a few good ideas, this tutorial shows you how to draw someone running directly at you.
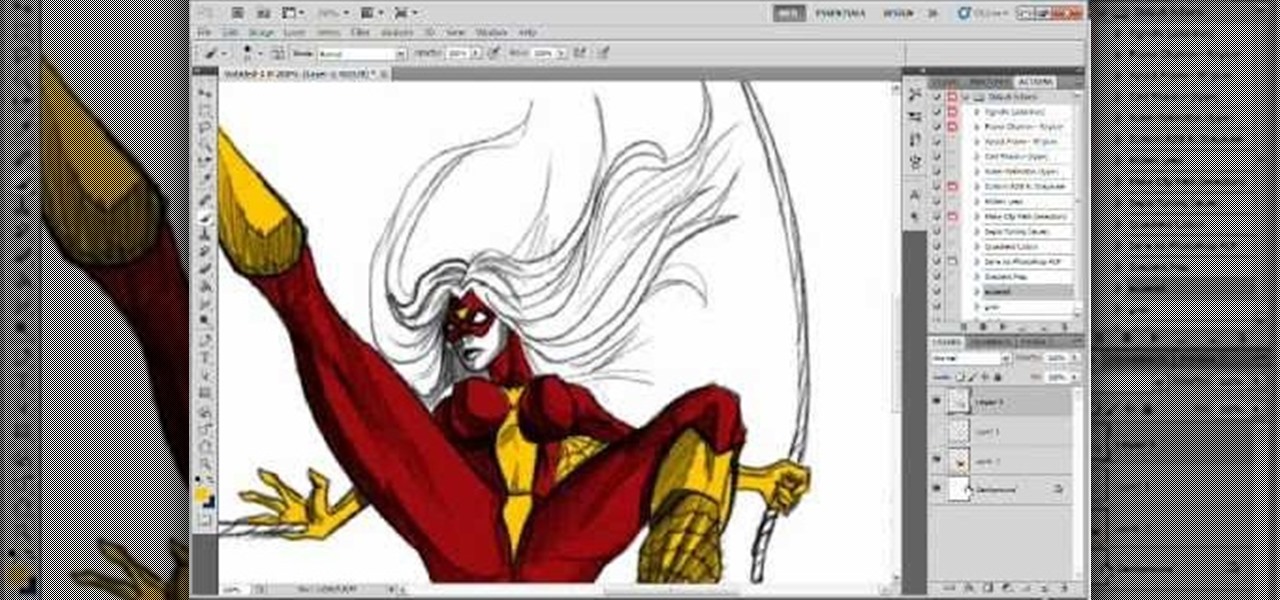
How To: Draw a realistic picture of Spider Woman in Photoshop
Want to draw your favorite comic book characters? This tutorial shows you how you can use Photoshop to draw a sketch of Spider Woman. Starting with some basic shapes, here's how you can make a realistic and detailed drawing of Spider-Woman.

How To: Use your computer to draw a picture of Wolverine from X-Men
This tutorial uses Photoshop, but any software program that lets you draw will be able to replicate this tutorial. Without using a model, here's how you can draw the comic book character Wolverine from X-Men in a variety of dynamic and powerful poses.
How To: Make a cute holiday outfit for your pet dog
Want a fun way to dress up your dog for the holidays? This tutorial shows you how you can whip up a cute little doggie outfit! You're also shown how to make a few fun holiday treats, like chocolate pretzels!
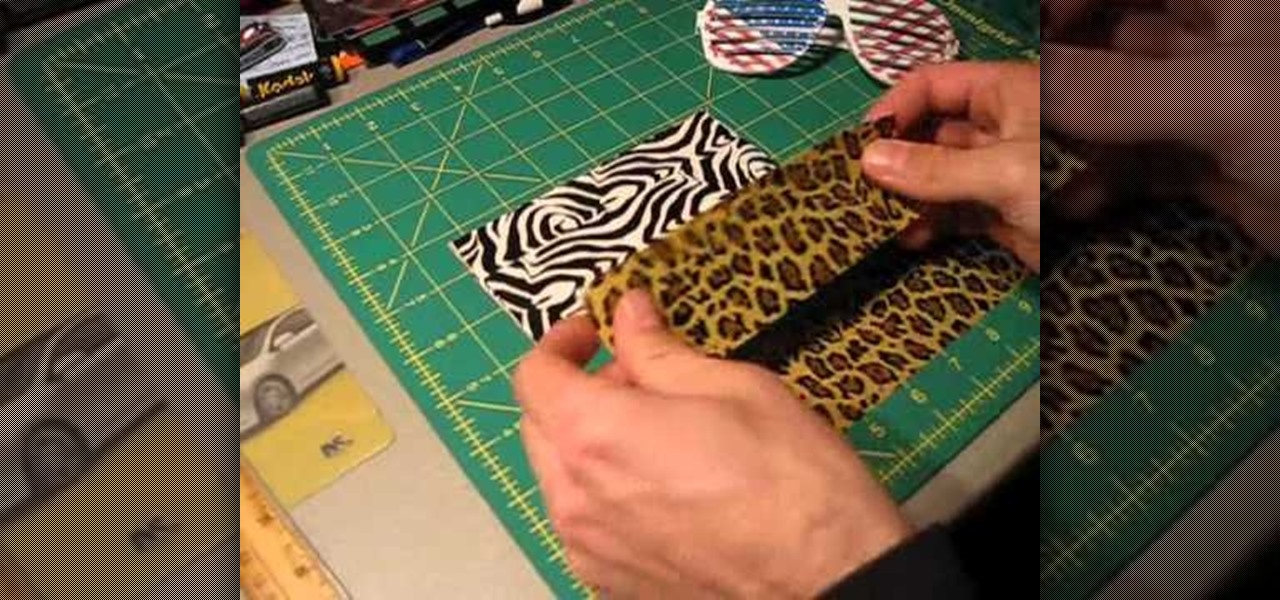
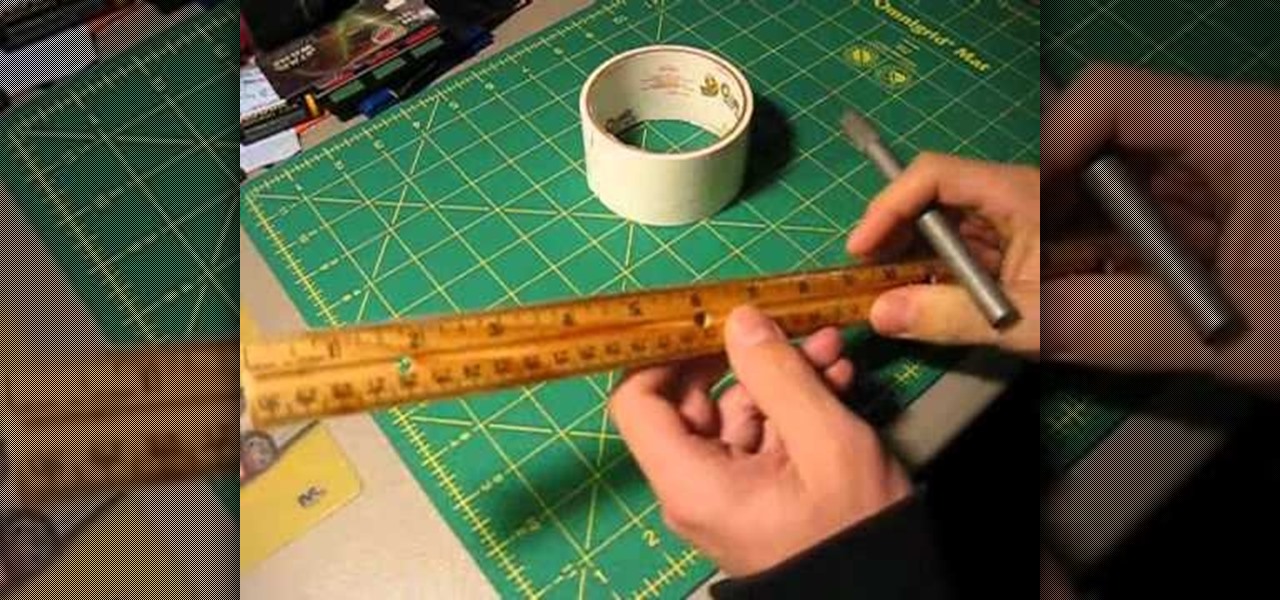
How To: Make a holder for your sunglasses out of duct tape
This mini tutorial will show you how to create a holder or case for your favorite pair of sunglasses. Of course, this tutorial will also work if you want just a regular glasses case, too! Make sure you have a ruler or measuring tape to measure the dimensions of your glasses.
How To: Make a holder for your iPhone or iPod Touch out of duct tape
This tutorial will work for either your iPod Touch or iPhone, and you can make a holder for it out of duct tape. Protect all your expensive electronics with this unique and trendy way to make a holder for it!
How To: Make a fall scarecrow decoration out of Cloud Clay
Cloud Clay is a new kind of non-toxic clay that doesn't need to be fired - it air dries by itself. This tutorial shows you how you can use several different colors of Cloud Clay to make an autumn scarecrow.

News: Everything Is Beautiful Under the Microscope
Below, a selection of images from the Nikon International Small World Photomicrography Competition. The Big Picture reports:
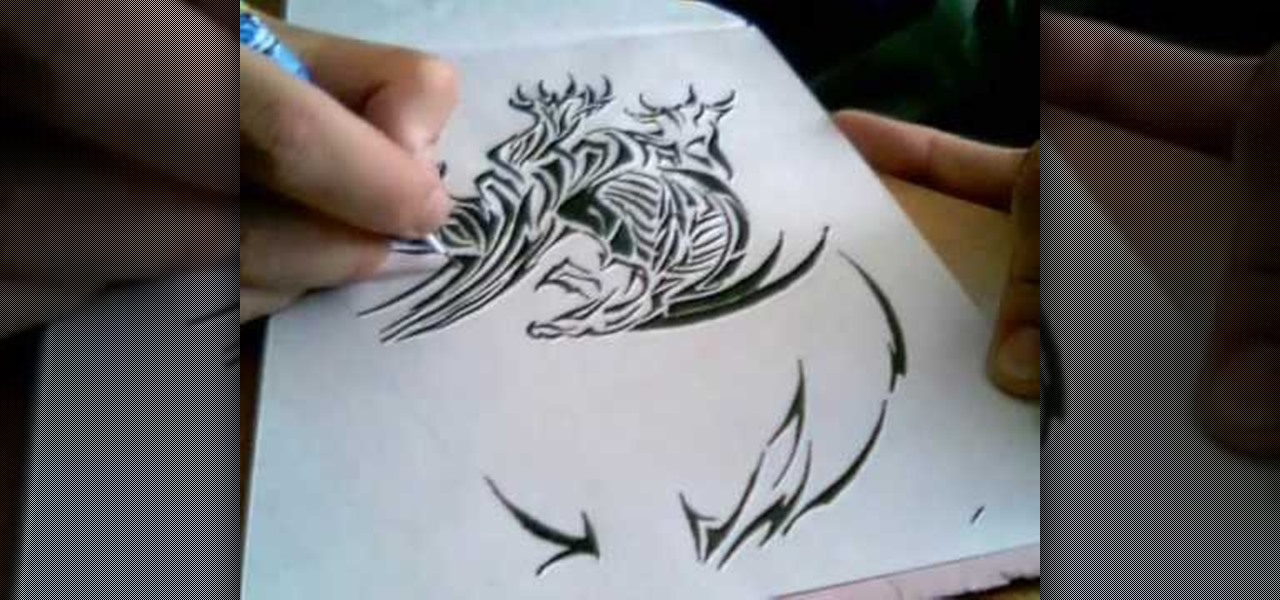
How To: Draw a tribal style dragon
In this tutorial, we learn how to draw a tribal style dragon. Start off by drawing the wings of the dragon, adding in tribal designs on the inside of it. After this, start to draw the head of the dragon, as well the inside of the face. Also, draw the legs and the claws of the dragon. Add in more details until you have a full dragon design. Use a pen to fill in the lines on the tribal design. It will sort of look like a zebra pattern with the black and white colors rotating. When finished, sig...